- File transfer
- File export
- File import
- Built-in file transfer tools
- Advanced file transfer tools
- Transfer content with media
- WooCommerce product transfer
- User data transfer
- Website URL transfer
- WordPress comments transfer
- Website widget transfer
- WordPress menu transfer
- Customizer settings transfer
- Media library transfer
- Theme demo imports
WordPress is a popular content management system used to build different kinds of websites, from simple blogs to complex e-commerce sites.
WordPress can do this because it supports different post types such as pages, posts, menus, users, comments, and more.
Some of these come built-in by default, and others can be created if needed.
1. File transfer
One of the great features of WordPress is its ability to export and import files.
This means you can easily move all or some of your website data to another website, migrate them to a new host, or back up your content in case of problems.
With WordPress’s built-in export and import features, you can transfer content with some limitations and a lack of advanced features.
To make the transfer of some or all of your site’s content easier, you’ll need to use some free WordPress plugins.
In this post, we have listed the plugins needed to selectively transfer your content easily.
Why might you need to transfer your site files?
- Migrate websites: Seamlessly transfer your entire WordPress home to a new server or domain, without starting from scratch.
- Share content: Collaborate with colleagues or migrate content between websites with ease.
- Backup and restore: Accidents happen. A quick export can save your bacon (and your website) from server crashes or plugin conflicts.
- Experiment safely: Test new themes or plugins without risking your live site. Simply export, experiment, and import back if things don’t work out.
Website content transfer
- WordPress basic content: WordPress has built-in tools for exporting and importing basic content like posts, pages, and comments. But for a comprehensive move, you’ll need some extra plugins with advanced features.
- Media movers: There are plugins designed to handle the heavy lifting of exporting and importing images, videos, and other media files.
- Theme settings: Theme settings and customizations can also be shared between WordPress installations. Compatible WordPress themes often include an Export/Import tab, usually as the last item, in their Theme Options for this purpose. Alternatively, themes with their settings in the Customizer can share their settings following this guide.
2. File exports
Have you poured your heart and soul into crafting a WordPress website, only to face the daunting prospect of moving it somewhere new?
Exporting your files is your secret weapon, a digital escape pod that captures the essence of your online haven.
With a few clicks, you’ll pack up your posts, pages, media, and even settings, ready to transplant your masterpiece to greener pastures.

NOTE: Before exporting files…
- Make sure that your WordPress installation, theme, and plugins are up-to-date.
- To avoid problems with your website while exporting files, backup your website to a secure location. This will allow you to restore your website should an error occur.
- Decide what to export based on your needs and use the appropriate WordPress plugins.
- Review the export settings carefully to avoid surprises.
- If you are handling a large amount of content, you may need to increase the PHP memory limit on your server.
- Keep your exported files secure and accessible for future use.
3. File imports
Importing files is just as crucial as exporting them in WordPress; it’s the bridge that connects the past and present states of your website.
Importing files brings your files and customizations from one site to another.
You can unpack your posts, pages, media, and settings with a few clicks, watching as your content finds its rightful place.

NOTES: Before importing files…
- Make sure that your WordPress installation, theme, and plugins are up-to-date.
- To avoid problems with your site while importing files, backup your website to a secure location. This will allow you to restore your website should an imported file corrupt it.
- Make sure you’re importing the correct file for the task at hand.
- If you are exporting a large amount of content, you may need to increase the PHP memory limit on your server.
- If you are importing content from a different website, you may need to reassign author or user roles after the import is complete.
- Review the import options and confirm your choices.
- Check your website thoroughly to ensure everything has been imported correctly after the import.
4. Built-in file transfer tools
Exporting Content
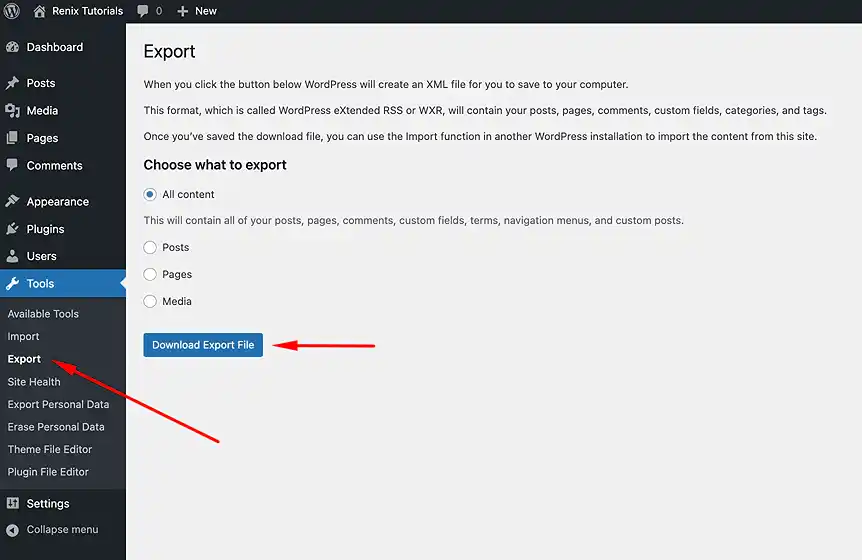
To export your WordPress content, follow these steps:
- Log in to your WordPress dashboard and go to Tools > Export.
- Select the content you want to export. You can choose to export all of your files or just specific types of content, such as posts, pages, or media.
- Click the “Download Export File“ button. WordPress will create an XML file that contains all of your exported content.
Importing Content
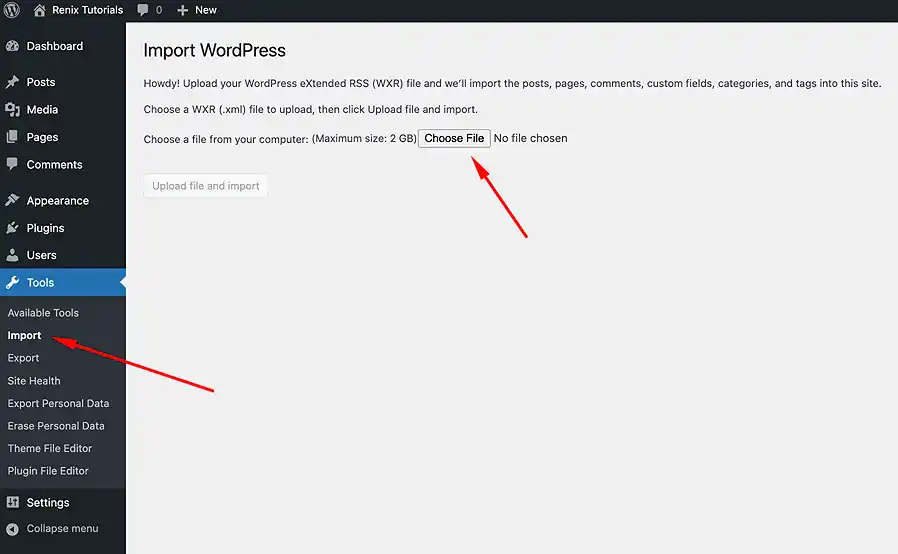
To import content into WordPress, follow these steps:
- Log in to your WordPress dashboard and go to Tools > Import.
- Install the WordPress importer. If you haven’t already installed the WordPress importer, you can do so by clicking the Install Now button.
- Click the Run Importer link.
- Select the XML file that contains the content you want to import.
- Click the “Upload file and import“ button. WordPress will import the content into your website.
5. Advanced file transfer tools
1. WP Import Export Lite plugin
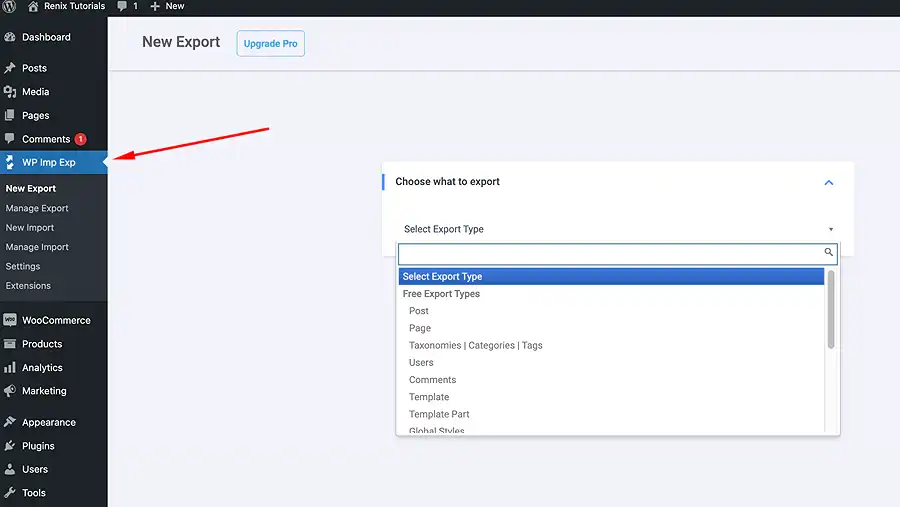
The WP Import Export Lite plugin is easy import-export software to transfer all or some of your WordPress website data, with support for multiple file formats.
It supports the transfer of CSV, XLS, XlSX, JSON, TXT, and XML, which is a lot more than the default export/import WordPress tools offer.
You can transfer posts, pages, custom post types, taxonomies, categories, tags, comments, users, templates, template parts, and global style.
The plugin has extensions to toggle the background import and export of files, among other extensions, making the file transfer process flexible.
You have the option to pause, resume, and stop the transfer as you deem fit, and you can also run multiple import-export processes at the same time.
Premium features include the transfer of WooCommerce products, product attributes, product reviews, orders, coupons, and customers, as well as the ability to schedule the import and export of site data.
2. WP All Import
The “Export any WordPress data to XML/CSV” and “Import any XML or CSV File to WordPress” plugins are two separate plugins by Soflyy in the WordPress plugin directory to export and import website files.
These plugins also have an edge over the default WordPress file transfer tools.
Exporting Files
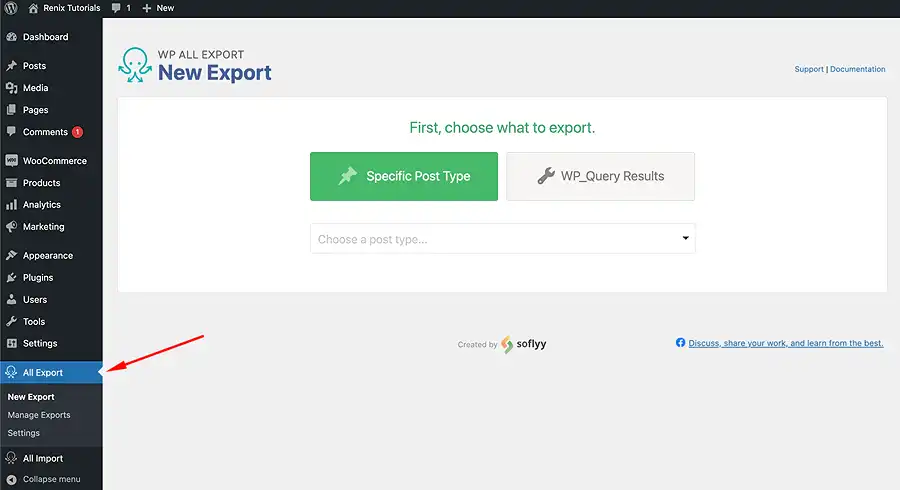
- Install and Activate the “Export any WordPress data to XML/CSV” plugin
- Navigate to All Export > New Export in your WordPress dashboard.
- Select the type of content you want to export, such as posts, pages, or custom post types.
- Click on “Customize export file” to proceed.
- Provide a descriptive name for your export and choose the export format, such as XML or CSV.
- Choose the specific content you want to export using the filter options.
- Click on the “Save & Run Export” button. WP All Import will process the export and generate an export file.
- On the next page, click on either the CSV (export file only) or Bundle (file + setting file for WP All Import) button to download the export file.
- Locate the generated export file in the Downloads folder on your computer.
Importing Files
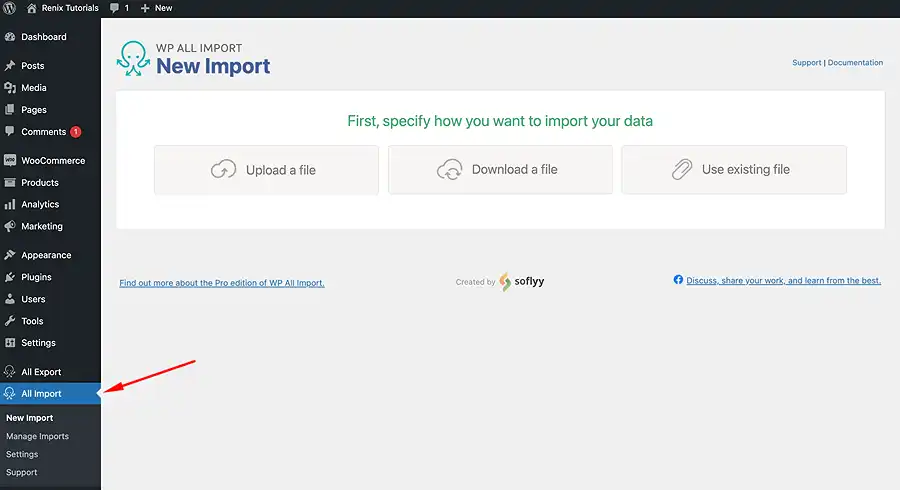
- Install and Activate the “Import any XML or CSV File to WordPress” plugin
- Navigate to All Import > New Import in your WordPress dashboard.
- Select the type of content you want to import, such as posts, pages, or custom post types.
- Click on the “Upload a File” option and select the export file you want to import or provide the URL of the export file if it’s hosted online.
- Review the import settings and make adjustments if necessary. You can choose the default author, import comments, and handle duplicate content.
- Create or select an import template that matches the structure of the file.
- Once you’ve configured the import settings and set the import template, click on the “Import” button to process the import and create new content based on the import file.
- Review the import results to verify that the content was imported correctly. Check for any errors or missing data elements.
6. Transfer content with media
Export media with selected content plugin
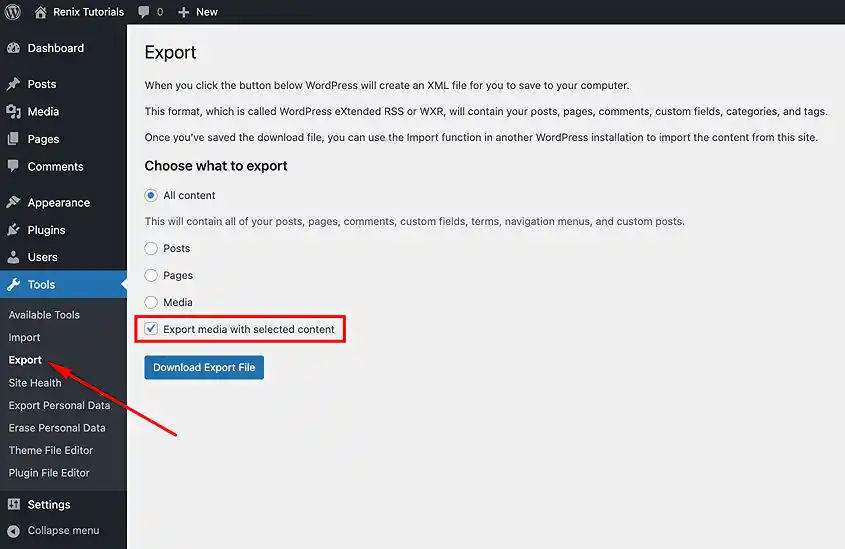
The export media with selected content plugin helps include linked media file exports.
This functionality does not come by default in WordPress installations.
When you enable it, the plugin tries to find featured images and included media in the post content, adding them to the export file.
Exporting files
- Log in to your WordPress dashboard and go to Plugins > Add New Plugin.
- Search for the “Export media with selected content” plugin from the WordPress plugin repository.
- Click on “install” then “activate” the plugin.
- Go to Tools > Export.
- Select the content you want to export. You can choose to export all of your files or just specific types of content, such as posts, pages, or media.
- Tick the “Export media with selected content” checkbox.
- Click the “Download Export File“ button. WordPress will create an XML file that contains all of your exported content.
Importing files

- On the destination site, log in to your WordPress dashboard and go to Tools > Import.
- Install the WordPress importer. If you haven’t already installed the WordPress importer, you can do so by clicking the Install Now button.
- Click the Run Importer link.
- Select the XML file that contains the content you want to import.
- Click the “Upload file and import“ button. WordPress will import the content into your website.
- Go to the Media Library in your WordPress dashboard.
- Verify that the media files from the exported posts or pages have been imported.
7. WooCommerce product transfer
The product import-export plugin lets you bulk export and import Woocommerce products from and to your store.
You can take advantage of an easy product bulk edit feature that eliminates the need to edit data using spreadsheet programs.
You can also use export filters to export products by category, tags, etc.
To migrate variation products, you will have to purchase their premium version.
The pro version also offers XML support, scheduled FTP import/export, additional export filters, and custom/meta import/export options.
Exporting products
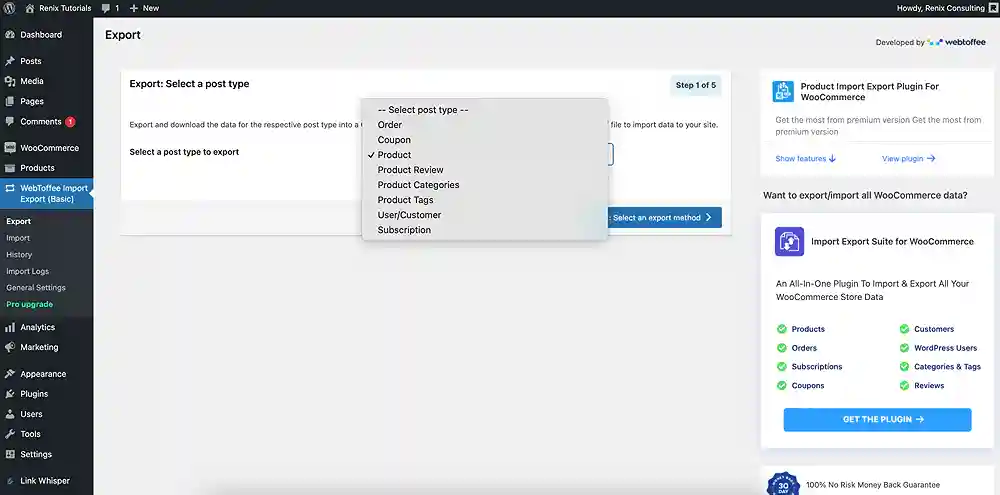
- Access your WordPress dashboard. Navigate to “Plugins” > “Add New.”
- Search for “Product Import Export for WooCommerce” by WebToffee.
- Click “Install Now” and then “Activate.”
- Locate the “WeebToffee Import and Export (Basic)” menu on the left-hand side of your dashboard. Hover over and click on “Export.”
- Choose the “file type” you want to export.
- Select your preferred format (CSV, XML, or Excel). CSV is often a good choice for compatibility.
- Check this box to export your entire product catalog. Alternatively, use filters to export only designated products based on categories, tags, stock status, etc.
- Consider adjusting export settings for images, reviews, custom fields, and other data as needed.
- Click the “Export” button to start the process. You’ll be prompted to download the exported file to your computer.
Importing products
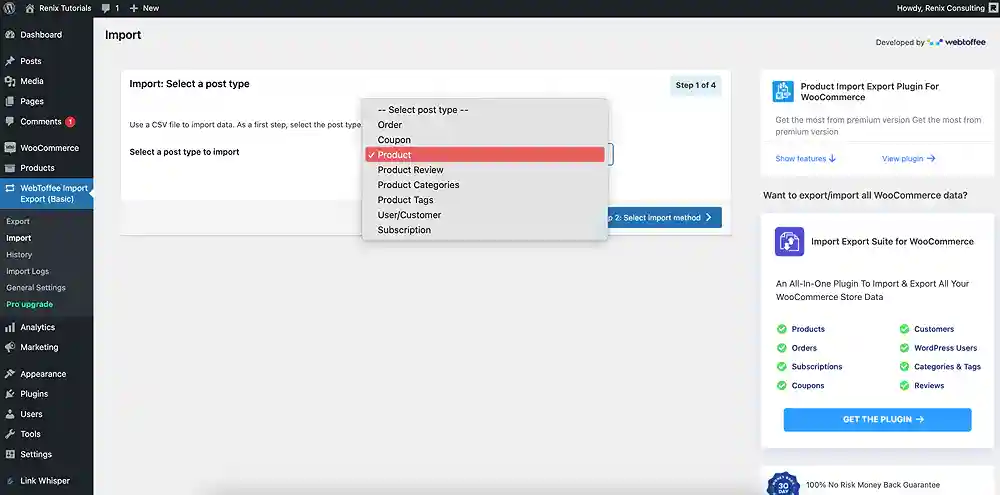
- Ensure the “Product Import Export for WooCommerce” plugin by WebToffee is installed and activated on your WordPress site.
- Locate the export file containing the product data that you downloaded from your previous store and ensure it is in a compatible format (CSV, XML, or Excel).
- Locate the “WeebToffee Import and Export (Basic)” menu on the left-hand side of your dashboard. Hover over and click on “Import.”
- Choose the “file type” you want to import.
- Click on “Choose File” and select your prepared product data file.
- Verify that the detected file type matches your uploaded file.
- Align the columns in your file with the corresponding WooCommerce product fields. The plugin often attempts auto-mapping, but carefully review and adjust as needed.
- Click the “Import” button to begin the process. The plugin will process the file and import your products into your WooCommerce store.
- Upon completion, review the import log for any errors or warnings.
- Inspect your product catalog to ensure the products have been imported correctly.
8. User data transfer
The WordPress user import-export plugin is a great tool for transferring your WordPress users from one website to another.
With this free plugin, you can export and import user data, including passwords, to and from your website.
For seamless continuity, the plugin allows you to retain user passwords. This means your users can access the new site with their familiar credentials.
You can streamline your workflow with the premium version’s advanced features.
Enjoy compatibility with top plugins like BuddyPress, Ultimate Member, and Advanced Custom Fields, and schedule automatic data transfers for complete control.
Exporting user data
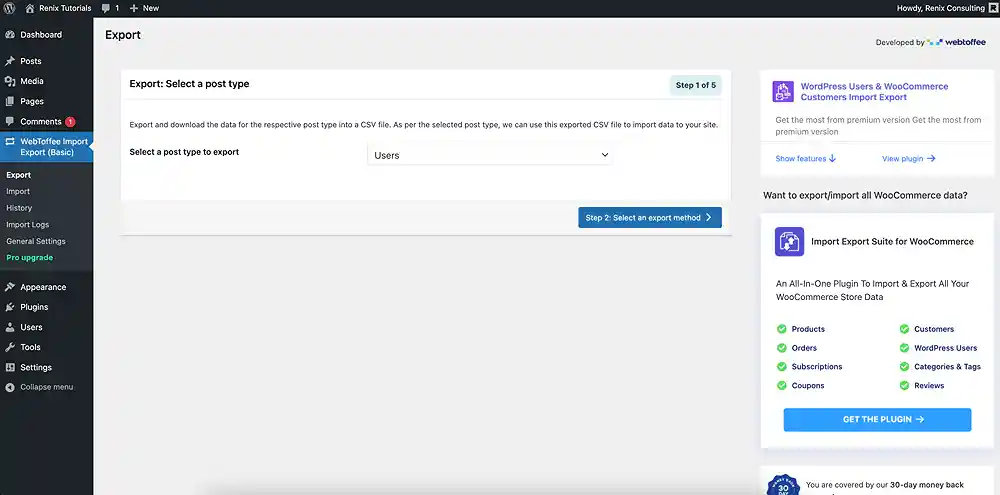
- Access your WordPress dashboard. Navigate to “Plugins” > “Add New.“
- Search for “Export and Import Users and Customers” by WebToffee.
- Click “Install Now” and then “Activate.”
- Locate the “WeebToffee Import and Export (Basic)” menu on the left-hand side of your dashboard. Hover over and click on “Export.”
- Select “Users” and then select the specific user roles you want to export (e.g., administrators, subscribers, and customers).
- Choose your preferred format (CSV or XML). CSV is a common choice for compatibility.
- Consider adjusting settings for exporting user passwords, metadata, and custom fields as needed.
- Click the “Export” button to start the process. The plugin will create and download the exported file to your computer.
- Open the downloaded file in a compatible application (e.g., spreadsheet software for CSV files).
- Review the exported user data to ensure it’s accurate and complete.
Importing user data
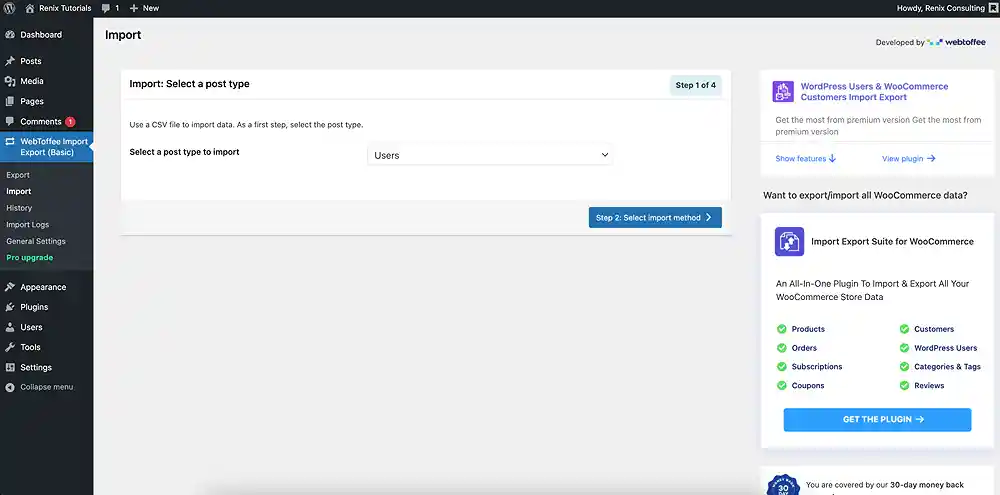
- On your destination site, if the plugin is not already installed, access your WordPress dashboard and navigate to “Plugins” > “Add New.”
- Search for “Export and Import Users and Customers” by WebToffee. Click “Install Now” and then “Activate.”
- Ensure you have the user data file you want to import. Acceptable formats: CSV or XML.
- The file structure must match the plugin’s requirements, typically including columns for usernames, emails, passwords (optional), and other relevant user information.
- Locate the “WeebToffee Import and Export (Basic)” menu on the left-hand side of your dashboard. Hover over and click on “Import.”
- Select “Users” and then choose your import method. Click the “Choose File” button and select the user data file from your computer. Verify that the file format is correct (CSV or XML).
- Configuring Import Options:
- Mapping Fields: Ensure the plugin correctly maps the fields in your file to the corresponding user fields in WordPress.
- Password Handling: Choose whether to import passwords from the file or assign temporary passwords to new users.
- User Roles: Select the default user role for imported users.
- Email Notifications: Decide whether to send email notifications to imported users.
- Click the “Import” button to start the process. The plugin will process the file and create new users or update existing ones based on the imported data.
- Upon completion, the plugin will display a summary of the import, indicating successful imports, errors, or skipped entries.
- Carefully review the results to ensure accuracy and address any issues.
9. Website URL transfer
The Export All URLs plugin by Atlas Gondal is a simple plugin that allows you to import and export all your site’s URL post IDs, titles, and categories.
This plugin comes in handy during site migration, security audits, SEO, and redirect purposes.
It is designed with filters that let you filter by author and date range.
 You can also exclude the domain URL, set a post range, and randomly generate a CSV file.
Exporting URLs
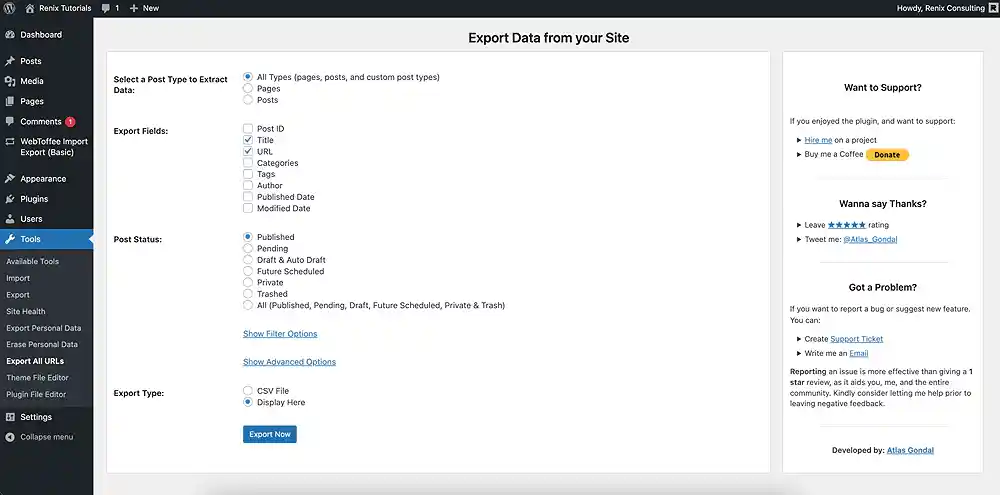
- Access your WordPress dashboard. Navigate to “Plugins” > “Add New Plugin.”
- Search for “Export All URLs” by Atlas Gondal. Click “Install Now” and then “Activate.”
- Locate the “Tools” menu in your dashboard sidebar. Click on “Export All URLs.”
- Customizing export preferences
- Post types: Select the specific post types whose URLs you want to export (e.g., posts, pages, media).
- Categories and tags: Choose whether to include URLs from specific categories or tags.
- Custom post types: If you have custom post types, select the ones you want to include.
- Output format: Choose your preferred output format (CSV or TXT).
- Custom delimiter: If desired, specify a custom delimiter to separate URLs in the output file.
- Click the “Export URLs” button to start the process. The plugin will generate the list of URLs and prompt you to download the file.
- Click the download link to save the exported file to your computer.
10. WordPress comments transfer
To move your comments between WordPress sites, look no further than the WordPress Comments Import and Export plugin by WebToffee!
It’s your one-stop shop to seamlessly import and export all your comments.
Go bulk or get selective with filters like articles, dates, and limits.
Need WooDiscuz or wpDiscuz compatibility? This plugin’s got you covered.
Exporting comments
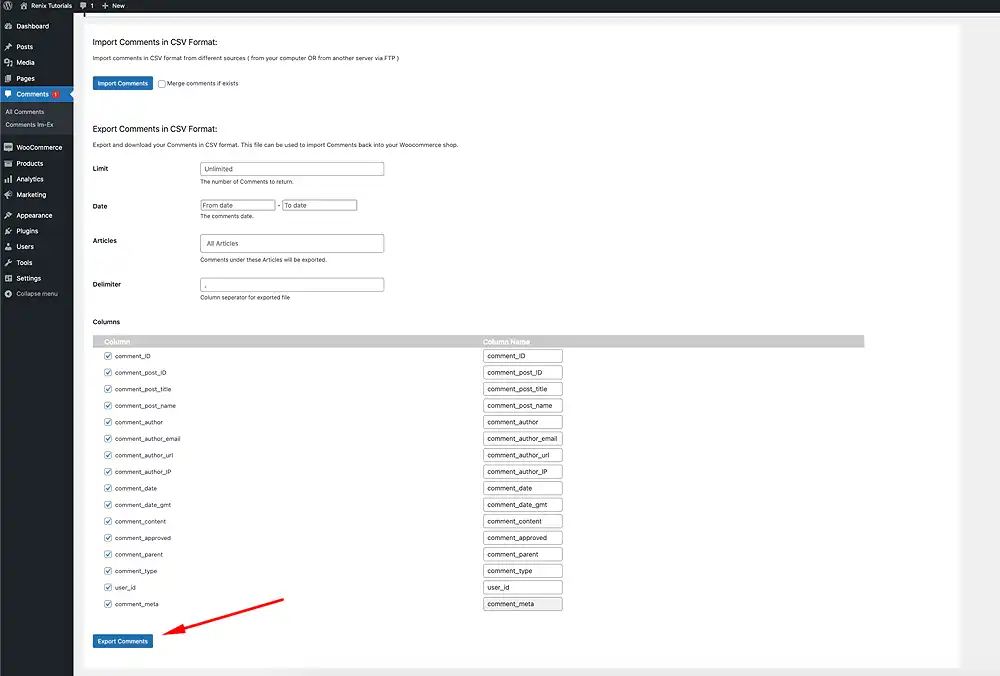
- Access your WordPress dashboard. Navigate to “Plugins” > “Add New.“
- Search for “WordPress Comments Import & Export” by WebToffee. Click “Install Now” and then “Activate.”
- Locate the “Comments” menu in your WordPress dashboard sidebar. Click on “Comments Import & Export.”
- If needed, use the filters to export only specific comments based on:
- Articles
- Start Date
- End Date
- Limit (number of comments)
- Click the “Export” button to start the export process.
- The plugin will generate a CSV file containing the selected comments.
- Click the “Download Export File” link to save the CSV file to your computer.
Importing comments
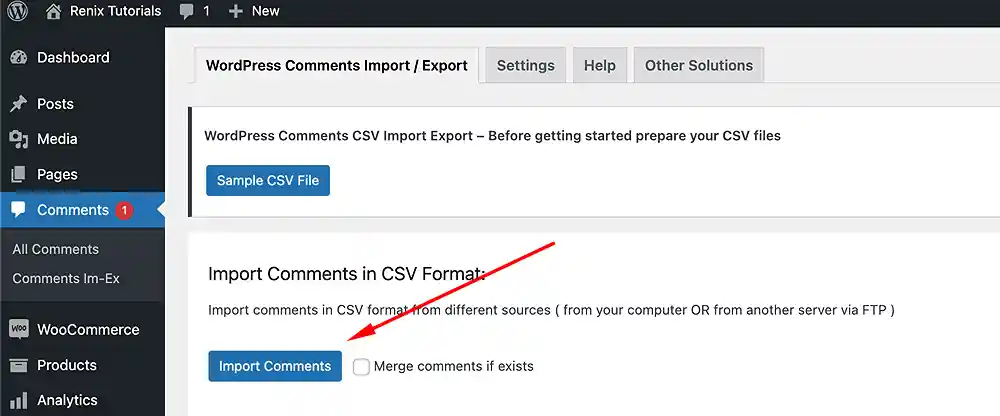
- Follow the same installation and activation steps as outlined in the export guide.
- Ensure you have a CSV file containing the comments you want to import. The file structure must match the plugin’s requirements, typically including columns for comment ID, author, email, content, post ID, and date. If unsure about the format, refer to the plugin’s documentation or export a sample comment file from a similar WordPress site.
- Go to “Comments” > “Comments Import & Export” in your WordPress dashboard.
- Click on “Import File” and select your prepared CSV file.
- If needed, adjust settings for author mapping: If the comment authors aren’t already users on your site, choose how to handle them (create new users, assign them to an existing user, or set a default author).
- Click the “Import” button to start the import process.
- The plugin will process the file and create comments based on the imported data.
- Upon completion, the plugin will display a summary of the import, indicating successful imports, errors, or skipped entries.
- Carefully review the results to ensure accuracy and address any issues.
11. Website widget transfer
Stop wasting time setting up your widgets from scratch.
The Widget Importer and Exporter plugin saves you the day by enabling seamless widget migration between websites.
This handy plugin lets you move your carefully configured widgets between sites with just a few clicks.
Exporting widgets
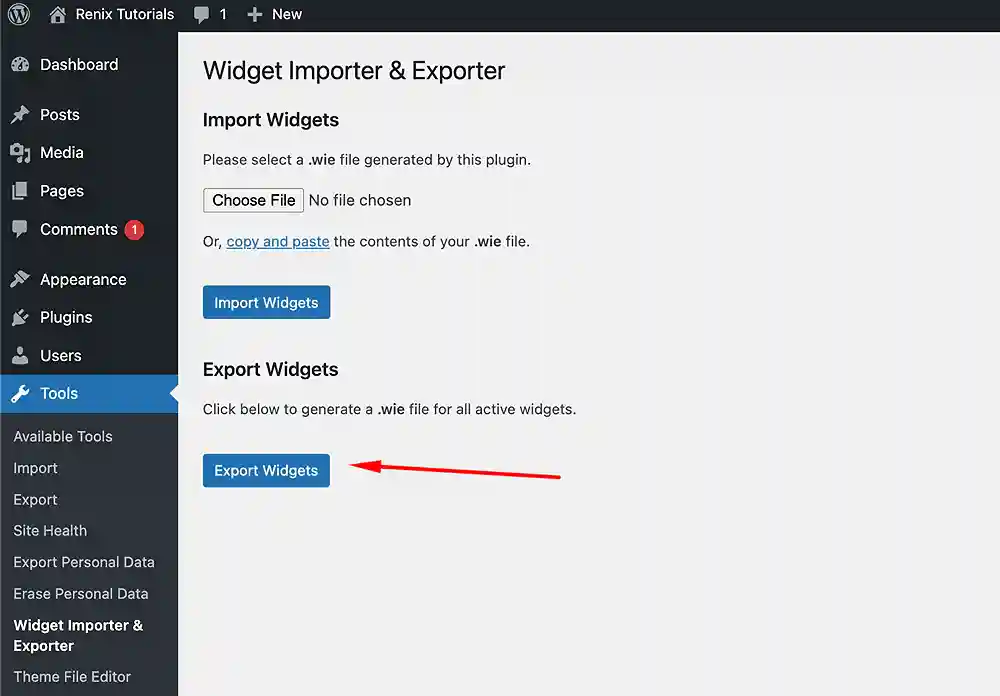
- Access your WordPress dashboard. Navigate to “Plugins” > “Add New.“
- Search for “Widget Importer & Exporter” by ChurchThemes.com. Click “Install Now” and then “Activate.”
- Locate the “Tools” menu in your WordPress dashboard sidebar. Click on “Widget Importer & Exporter.“
- Click the “Export Widgets” button. The plugin will automatically create a .wie file containing your current widget settings and arrangements.
- Click the “Download Export File” button to save the .wie file to your computer.
Importing widgets
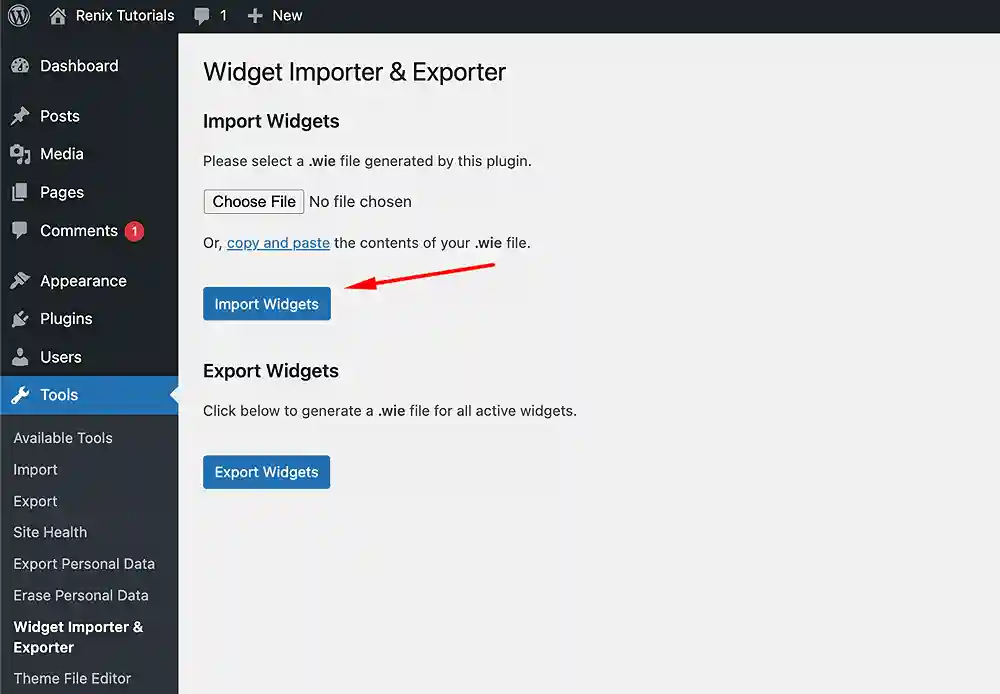
- Follow the same installation and activation steps as outlined in the export guide.
- Ensure you have a .wie file containing the widgets you want to import. This file is typically created using the same plugin on another WordPress site or provided by a theme or plugin developer.
Go to “Tools” > “Widget Importer & Exporter” in your WordPress dashboard. - Click the “Choose File” button and select your prepared .wie file.
- Click the “Import Widgets” button to start the import process. The plugin will analyze the file and display a summary of the import actions it will take.
- Carefully review the summary, which will indicate
- The widgets are to be imported.
- Inactive widgets that will be added,
- Widgets that already exist and will be replaced, and
- Widgets that cannot be imported due to missing sidebars.
- If satisfied with the summary, click the “Import Widgets” button again to proceed with the import.
- Upon completion, the plugin will display a detailed report of the import process, including successful imports, inactive widgets, replaced widgets, and any errors or skipped widgets.
- Review the report to ensure the import was successful and address any issues.
12. WordPress menu transfer
Need to transfer menus between sites or safeguard them for later use?
The “Export Import Menus“ plugin by Akshay Menariya is your go-to solution.
The plugin also supports the Uber menu plugin.
The import must be done on the same domain from which you exported the file.
Exporting menus
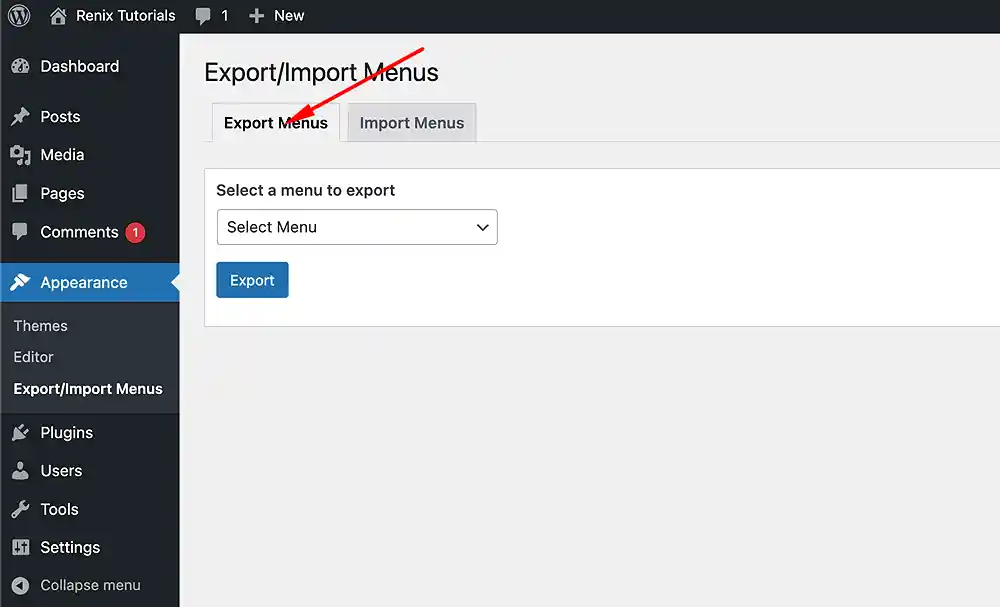
- Access your WordPress dashboard. Navigate to “Plugins” > “Add New.”
- Search for “Export Import Menus” by Akshay Menariya. Click “Install Now” and then “Activate.”
- Locate the “Appearance” menu in your WordPress dashboard sidebar.
Click on “Export Import Menus.” - Choose the menus you want to export by checking the boxes next to their names.
If desired, use the “Month” dropdown to filter menus by creation month. - Click the “Export” button.
The plugin will generate an XML file containing the selected menus and prompt you to download it. - Click the “Download Export File” button to save the XML file to your computer.
Choose a location where you can easily access it for future imports.
Importing menus
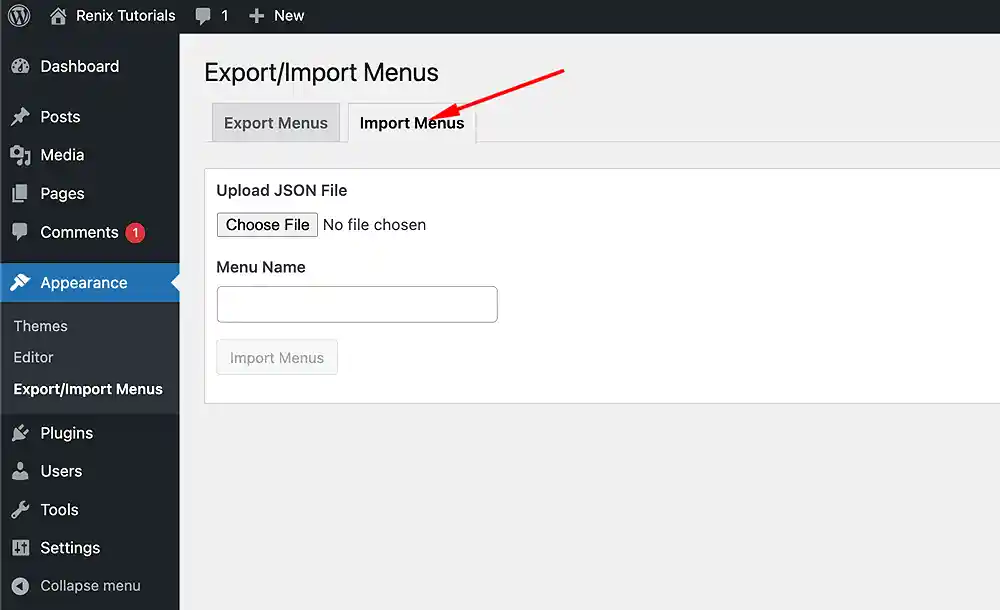
- Follow the same installation and activation steps as outlined in the export guide.
- Ensure you have an XML file containing the menus you want to import. This file is typically created using the same plugin on another WordPress site or provided by a theme or plugin developer.
- Go to “Appearance” > “Export Import Menus” in your WordPress dashboard.
- Click on the “Import” tab. Click the “Choose File” button and select your prepared XML file.
- Click the “Import” button to start the import process. The plugin will analyze the file and display a summary of the menus it will import.
- Carefully review the summary to ensure the correct menus are being imported.
- Note any warnings or errors that the plugin identifies.
- If satisfied with the summary, click the “Import” button again to proceed with the import.
- Upon completion, the plugin will display a message indicating the success or failure of the import.
- Check your WordPress menus under “Appearance” > “Menus” to ensure they have been imported correctly.
13. Customizer settings transfer
Say goodbye to repetitive configuration!
The Customizer Export/Import plugin lets you import and export all your WordPress customizer settings, including colors, layouts, and more.
Transfer customizations between sites, create setting backups and enjoy ultimate control over your theme’s appearance.
If your theme makes use of the WordPress customizer for its settings, this plugin is for you!
Exporting customizer settings
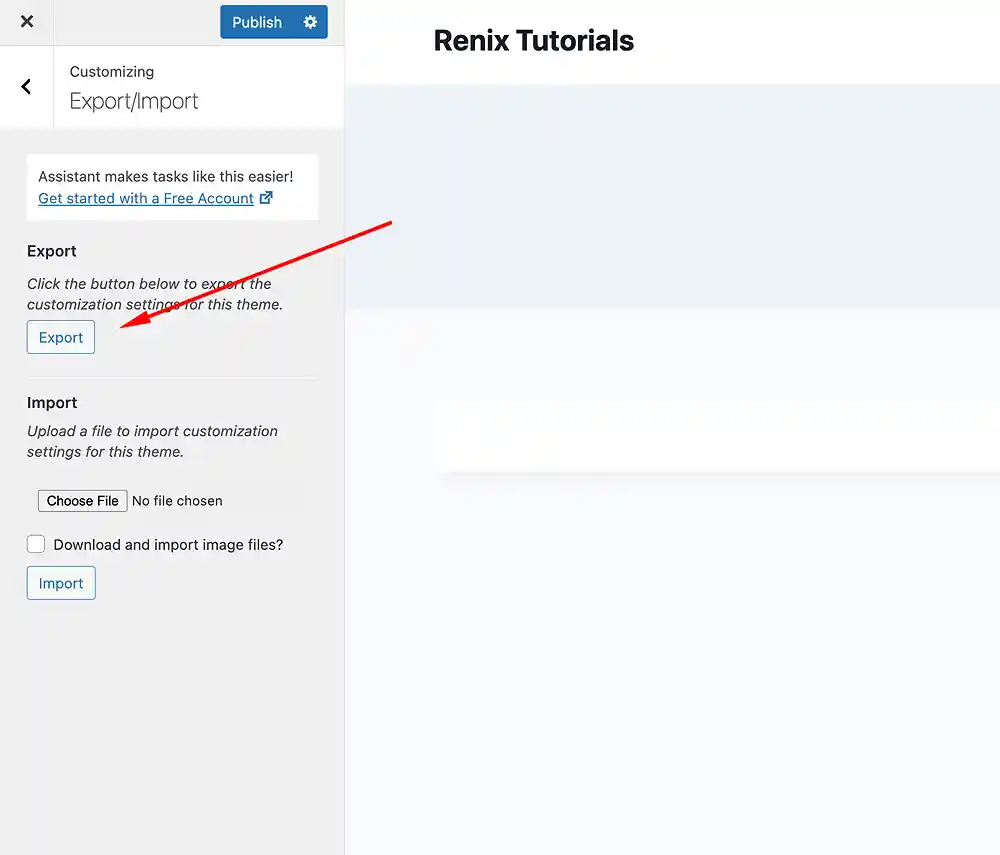
- Access your WordPress dashboard. Navigate to “Plugins” > “Add New.”
- Search for “Customizer Export/Import” by The Beaver Builder Theme. Click “Install Now” and then “Activate.”
- Go to “Appearance” > “Customize” in your WordPress dashboard to open the Customizer.
- Look for the “Export/Import” tab within the Customizer (usually at the bottom).
- Click the “Export” button within the “Export/Import” tab.
- The plugin will automatically create a JSON file containing your current Customizer settings.
- Click the “Download Export File” button to save the JSON file to your computer.
Importing customizer settings
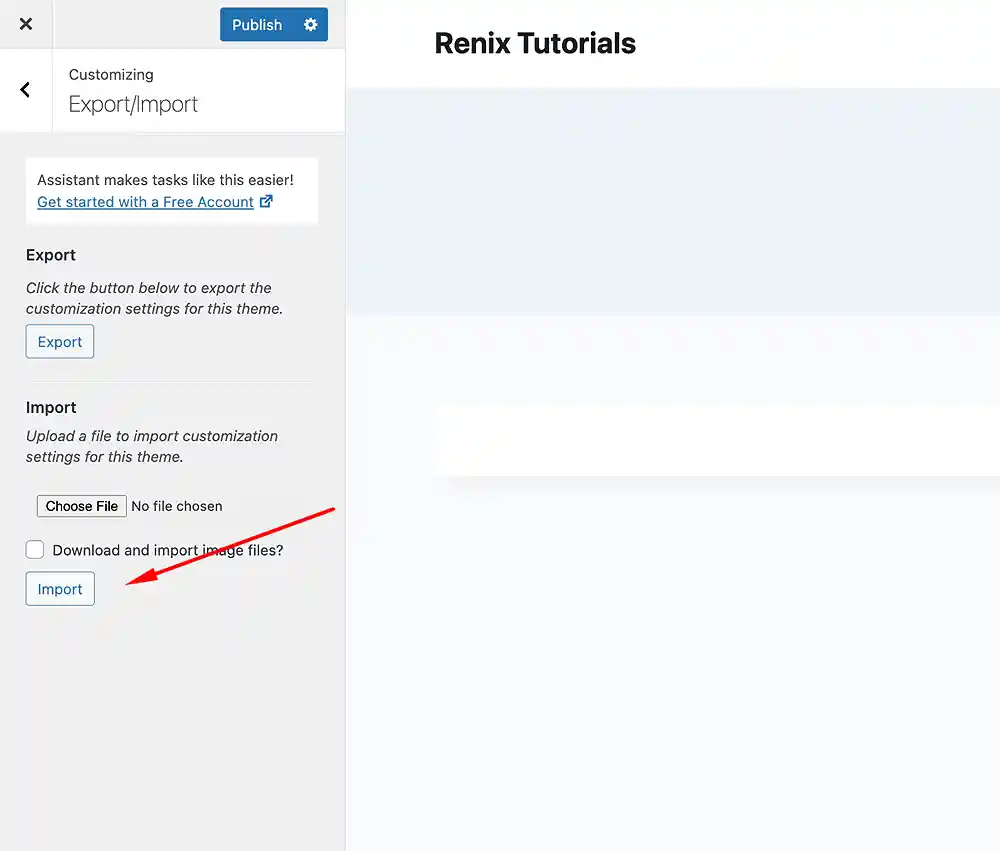
- Follow the same installation and activation steps as outlined in the export guide.
- Ensure you have a JSON file containing the Customizer settings you want to import. This file is typically created using the same plugin on another WordPress site or provided by a theme developer.
- Go to “Appearance” > “Customize” in your WordPress dashboard to open the Customizer.
- Locate the “Export/Import” tab within the Customizer.
- Click on the “Import” tab within the “Export/Import” section.
- Click the “Choose File” button and select your prepared JSON file.
- If the imported settings include images, select whether you want to download and import images from their original URLs or skip image importing.
- Click the “Import” button to start the import process. The plugin will analyze the file and display a summary of the settings it will import.
- Carefully review the summary to ensure the correct settings are being imported. Note any warnings or errors that the plugin identifies.
- If satisfied with the summary, click the “Import” button again to proceed with the import.
- Upon completion, the plugin will display a message indicating the success or failure of the import.
- Check your WordPress Customizer to ensure the settings have been applied correctly.
14. Media library transfer
Should you need to migrate your website or wish to back up your media library, look no further than the Export Media Library plugin by Mass Edge Inc.
This plugin allows users to export the media library files as a compressed zip archive.
Export media library
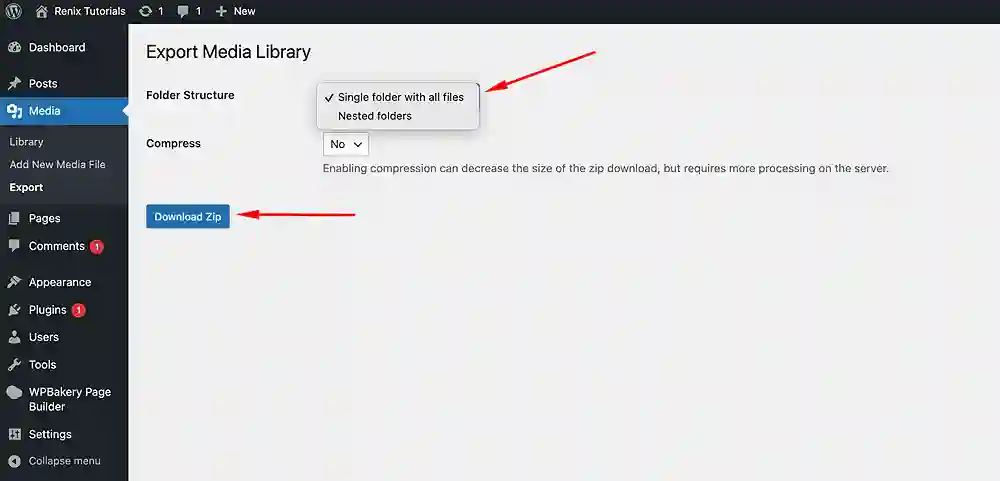
- Access your WordPress dashboard. Navigate to “Plugins” > “Add New.”
- Search for “Export Media Library” by Mass Edge Inc. Click “Install Now” and then “Activate.”
- Go to “Media” > “Export” in your WordPress dashboard.
- Folder structure: Decide whether to create a single file or organize files by upload month.
- Compression: Decide whether to compress the export zip file or not.
- Click the “Download Zip” button to start the export process.
- The plugin will create a zip archive or a folder containing your media files. Click the “Download” button to save the file to your computer.
Import media library
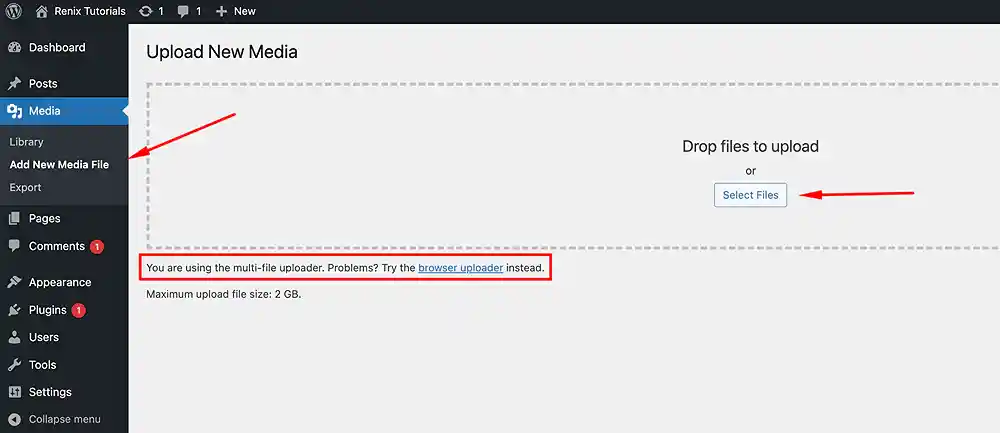
- Go to “Media” > “Library” in your WordPress dashboard. Click the “Add New” button at the top.
- If you have a single zip archive, click the “Select Files” button and select the earlier exported zip file.
- WordPress will automatically extract the files and create media entries for them.
- Check your media library to ensure the files have been imported successfully. If necessary, refresh your browser or clear your cache to see the updated library.
15. Theme demo imports
Theme demos offer users an opportunity to build their websites with pre-designed site files, as opposed to starting with a blank page.
A majority of themes are compatible with the “One Click Demo Import” plugin by OCDI.
However, some themes are not compatible with the plugin and come pre-designed with in-built demo import functionalities.

To understand how the One Click Demo Import works, you start by choosing a demo that perfectly aligns with your vision, and with a single click, the plugin effortlessly recreates its layout, content, and settings on your new site.
No more manual setup, no more frustration—just a beautiful website that springs to life before your eyes.
Importantly, ensure you have a fresh WordPress installation with no existing content or settings that you want to keep, as the import will overwrite them.
Importing theme demo
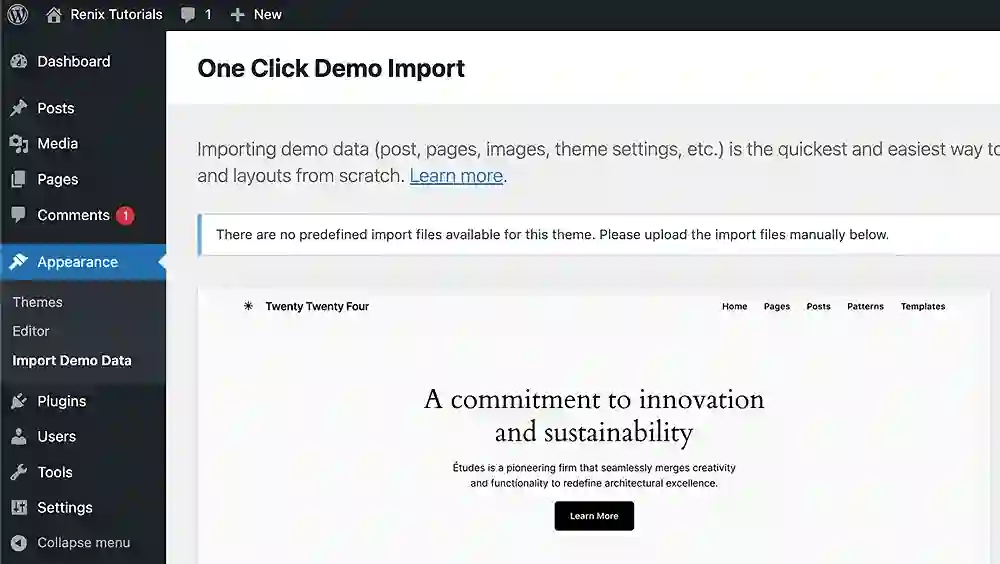
- Access your WordPress dashboard. Navigate to “Plugins” > “Add New.”
- Search for “One Click Demo Import” by OCDI. Click “Install Now” and then “Activate.”
- The plugin will often add an “Import Demo Data” menu item to your WordPress dashboard. Look for it under “Appearance” as a standalone submenu item.
- Once on the demo import screen, for a compatible theme, you’ll typically see a list of available demos with previews. Choose the demo that best suits your vision and click its “Import” button.
- Some themes offer customization options during import, such as:
- Importing content only (posts, pages, and media)
- Importing theme settings only
- Importing widgets
- Choosing image sizes to import
- Select the options that align with your needs.
- Click the “Import Demo” button to start the import process.
- The plugin will display a progress bar and messages indicating the import status. This process might take a few minutes, depending on the size of the demo and your server speed. If you encounter errors, check the plugin’s documentation or contact theme support for guidance.
- Upon successful completion, the plugin will usually display a success message and prompt you to view your imported website.
Did you enjoy this post?
If so, please share it with your friends and followers on social media! It's a great way to help others learn about WordPress and to support our blog. You can use the share buttons below...
Elevate Your Brand with Professional Website Design
Discover how we can transform your online presence with professional website design services. We specialise in creating modern, user-friendly websites tailored for the medical, legal, university, and Christian sectors. If you're ready to elevate your brand and connect with your audience more effectively, contact us today to get started!
Tutorials on YouTube
And if you’re looking for more in-depth WordPress tutorials,be sure to subscribe to our YouTube channel! We have a wide variety of videos on WordPress.
