WordPress themes are like pre-built houses; they are beautiful and functional, but sometimes you crave a personal touch.
This is where child themes come in!
A child theme is a theme that inherits the functionality and styling of another theme called the parent theme but acts as a separate entity.
The use allows users to make customizations and modifications without altering the original parent theme files directly.
It is widely used to preserve modifications through theme updates and ensure a structured and maintainable approach to WordPress website development.
It is like an extension of the original theme, allowing you to customize it to your heart’s content without fear of breaking things.
Think of it like a smaller house built within the larger one, sharing the foundation and basic structure but free to have its own unique design elements.
In this blog post, we’ll delve into what a child theme is, why it is crucial, and how to create and use it effectively.
Why use a child theme?
- Preserving customizations: When you customize a theme directly, your changes may be lost during theme updates. A child theme protects your modifications, as it remains separate from the parent theme.
- Ease of updates: Parent themes often receive updates to enhance security, add features, or improve performance. With a child theme, you can safely update the parent theme without losing your customizations.
- Maintainable development: Child themes promote a modular and organized development approach. You can categorize your custom code, making it easier to manage and understand.
- Faster development: Creating a child theme is quicker than building a theme from scratch. It allows developers to leverage existing themes as a foundation and focus on specific customizations.
- Collaborative development: If multiple developers are working on a project, child themes simplify collaboration. Each developer can work on specific aspects without interfering with others’ work.
- Safe Tweaking: No more heart palpitations when updating the parent theme! Your customizations stay safe and sound, nestled in your child theme’s cozy embrace.
Child theme best practices
1. Backup your site
Before making changes, it’s a good practice to back up your website to avoid data loss.
2. Review the analyzed settings
Before creating the child theme, review the analyzed settings to ensure they align with your customization goals.
3. Regularly update parent and child themes
Ensure that both the parent and child themes are kept up-to-date to benefit from the latest features and security patches.
4. Document your changes
Add comments to your code to explain the purpose of each customization.
This documentation will be valuable in the future.
5. Use child themes for custom functionality
Beyond styling changes, child themes can also include custom functionalities by adding custom templates or functions.
6. Test Thoroughly
Before deploying your child theme to a live site, thoroughly test it in a staging environment to catch any potential issues.
Useful child theme plugins
Creating a child theme
1. Using FTP
- Planning your child theme: Before creating a child theme, identify the specific customizations you want to make. This could include changes to styles, templates, or the addition of custom functionalities.
- Gather your tools: You’ll need a text editor (Notepad++ or Sublime Text are great choices) and FTP access to your WordPress hosting.
- Choose your parent theme: Select a theme that offers strong functionality and a solid foundation for your customizations.
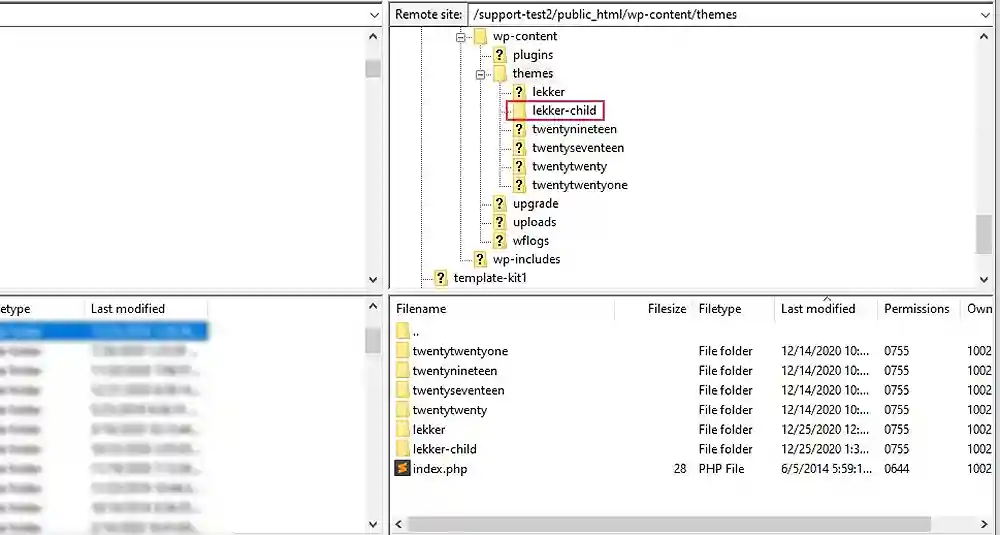
- Create the child theme folder: Within your WordPress theme directory (“wp-content/themes/”), create a new folder with a name like “your-theme-child.” Name it something relevant and unique.
- Style.css file: Inside the folder, create a file named “style.css.” This file defines your child theme’s identity, referencing the parent theme and declaring your styles.
- Enqueue styles: Tell WordPress to load your child theme’s stylesheet after the parent theme’s using the wp_enqueue_scripts function.
- Customize at will: Add your custom CSS, PHP files, and functionalities to personalize your website as you please. Add CSS styles to change colors, fonts, layouts, and anything else your heart desires. You can even override specific parent theme files if needed.
- Activate your child theme: Navigate to the WordPress dashboard, go to “Appearance” > “Themes,” and activate your child theme.
2. Using a plugin
- Navigate to your WordPress dashboard. In the left sidebar, go to “Plugins” and click on “Add New.“
- In the search bar, type “Child Theme Configurator,” locate the plugin by Lilaea Media, click “Install Now,” and then activate the plugin.
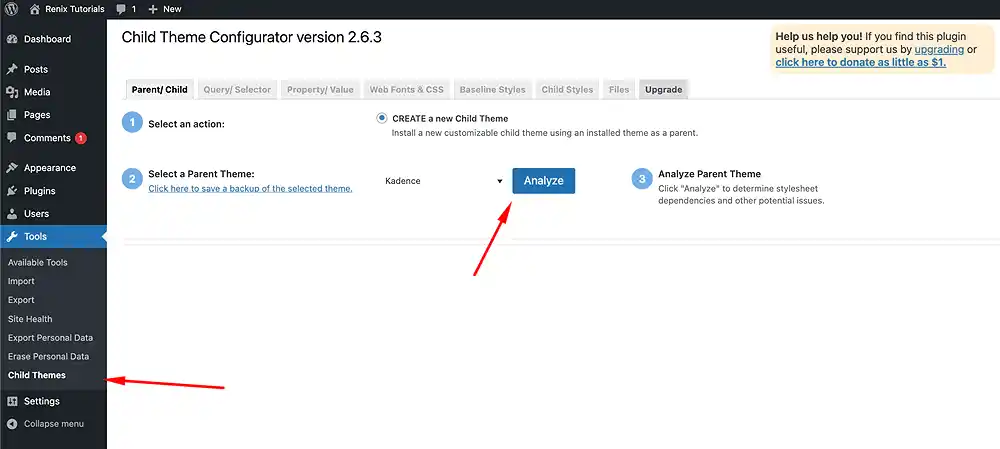
- After activation, go to “Tools” > “Child Themes” in the WordPress dashboard.
- In the “Select a Parent Theme” tab, choose the theme for which you want to create a child theme.
- Click the “Analyze” button to allow the plugin to inspect the parent theme and prepare the child theme.
- Once the analysis is complete, you’ll be presented with options to configure your child theme. Review and adjust settings as needed, including child theme directory, theme name, description, and author information.
- Optionally, you can choose advanced options like copying theme settings and customizer options from the parent theme to the child theme.
- You’ll see a summary of your configuration. Click the “Create New Child Theme” button.
- After the child theme is created, you’ll receive a success message and an option to preview the theme.
- Go to “Appearance” > “Themes” in the WordPress dashboard. Activate your newly created child theme.
- With the child theme activated, go to “Appearance” > “Customize” to start customizing the child theme.
- Make adjustments to your site, such as modifying colors, fonts, and layout options. Save your changes.
Did you enjoy this post?
If so, please share it with your friends and followers on social media! It's a great way to help others learn about WordPress and to support our blog. You can use the share buttons below...
Tutorials on YouTube
And if you’re looking for more in-depth WordPress tutorials,be sure to subscribe to our YouTube channel! We have a wide variety of videos on WordPress.