A code is a set of instructions written in a specific language that tells a computer what to do, including displaying text or images on a screen, storing and retrieving data, sending and receiving information, etc.
It’s the fundamental building block of software, websites, apps, and other digital systems.
Whether you’re a blogger, entrepreneur, or developer, there may come a time when you need to incorporate custom code into your WordPress site.
This could be anything from adding analytics tracking code, embedding a video, or integrating a custom feature to integrating third-party services.
In this guide, we’ll walk you through the process of placing codes on your WordPress website.
Reasons why you might place codes on your website
1. Enhance functionality and features
- Add custom post types or taxonomies to organize content differently.
- Create interactive elements like calculators, quizzes, or forms.
- Integrate social media feeds or payment gateways.
2. Integrate third-party tools and services
- Connect with Google Analytics, Facebook Pixel, or other tracking tools.
- Add live chat, email marketing, or social sharing buttons.
- Embed maps, videos, or other content from external sources.
3. Customize design and user experience
- Modify the website’s layout, colors, fonts, and styles with CSS.
- Add custom animations or effects with JavaScript.
- Optimize for different devices and screen sizes.
4. Improve website performance and SEO
- Minify and combine code files to reduce loading times.
- Optimize images for faster loading.
- Add structured data for better search engine visibility.
5. Implement custom tracking and analytics
- Track user behavior and interactions beyond what standard analytics tools provide.
- Gather data for A/B testing and website optimization.
6. Add interactive elements and dynamic content
- Create image carousels, sliders, or other dynamic content.
- Add personalized content based on user preferences.
- Implement gamification elements to engage users.
7. Create unique functionalities
- Develop custom features tailored to your specific website needs.
- Build a membership site, an online store, or other specialized functionality.
8. Gain greater control
- Customize the website’s behavior and appearance beyond what themes and plugins offer.
- Fine-tune the website to match your exact vision.
9. Stay ahead of the curve
- Implement cutting-edge web technologies and features.
- Offer a unique and innovative user experience.
10. Reduce reliance on plugins
- Minimize the number of plugins installed to improve website speed and security.
- Have more control over the code that runs on your website.
Guidelines for placing codes on your website
1. Backup your website
Before making any changes or adding new code, create a backup of your WordPress site.
This ensures that you can restore your site to its previous state if any issues arise.
2. Consider the use of a code plugin
Plugins like “Code Snippets” provide a safe way to manage custom code.
They offer a user interface within the WordPress dashboard, allowing you to add, edit, and deactivate code snippets easily.
3. Use a child theme
When making changes to theme files, always use a child theme.
This prevents your modifications from being overwritten during theme updates.
If you’re not familiar with child themes, numerous plugins simplify the process.
4. Choose the right file to edit
Identify the appropriate file for your code placement.
Common files include header.php, footer.php, and functions.php.
Understand the purpose of each file and choose accordingly.
5. Use the customizer for CSS
For simple CSS changes, leverage the WordPress Customizer’s “Additional CSS” section.
This is a user-friendly way to add styling without directly editing theme files.
6. Organize code effectively
Keep your code organized and well-commented.
Use comments to describe the purpose of each code snippet, making it easier for you or others to understand and maintain in the future.
7. Test code changes
After adding or modifying code, thoroughly test your website.
Ensure that the changes don’t break existing functionality, and verify the appearance across different devices and browsers.
8. Security considerations
Only use code from trusted sources.
Avoid adding code snippets from unverified websites or sources, as this can introduce security vulnerabilities.
Regularly update WordPress, themes, and plugins to patch security vulnerabilities.
9. Regularly review and clean up code
Periodically review your custom code and remove any snippets that are no longer necessary.
Unnecessary code can contribute to performance issues.
10. Document your changes
Keep a record of the changes you make, especially if you’re modifying theme files or using a custom code plugin.
Documentation helps you understand the evolution of your website and assists other developers who might work on it.
11. Consider performance impact
Be mindful of the performance impact of your custom code.
Minimize unnecessary scripts and optimize your code for faster page loading times.
12. Stay informed on updates
Stay updated on best practices for coding in WordPress.
Follow the official WordPress coding standards and guidelines to ensure compatibility and maintainability.
Methods to placing codes on your website
1. Using a code plugin
Use case: For those uncomfortable with editing theme files, placing extensive code snippets or site-wide modifications
You can manage multiple code snippets efficiently and add them to the header, footer, or other specific areas.
Recommended plugins
How to set up

- Navigate to your WordPress dashboard. In the left sidebar, go to “Plugins” and click on “Add New.”
- In the search bar, type “WPCode-Insert Headers and Footers.” Locate the plugin, click “Install Now,” and then activate the plugin.
- After activation, you’ll find a new menu item called “Code Snippets” in the WordPress dashboard. Click on it.
- On the plugin page, you’ll see all the default code snippets. Plugin submenu items include +Add Snippet, Header & Footer, etc.
- +Add Snippet: add your custom code or use any of the available code templates.
- Header & Footer: paste codes to display in the Header, Body, and/or Footer of your site.
- Once you’ve added the desired code, scroll down to the bottom of the page. Click the “Save” button to save your changes.
- After saving, visit your website to ensure that the code is placed correctly. You can view the page source (right-click on the page and select “View Page Source”) to confirm that your code is present.
- Test your website thoroughly to ensure that the added code does not affect its functionality negatively.
- If you encounter issues, return to the plugin settings and adjust or remove the code as needed.
2. Using an application plugin
Use case: availability of an application- or integration-specific plugin.
Popular examples: Facebook Pixel, MailChimp for WordPress, etc.
How to set up
- Follow plugin-specific instructions for code placement.
3. Google Tag Manager + Site Kit
Use case: For managing multiple tracking codes and scripts
How to set up
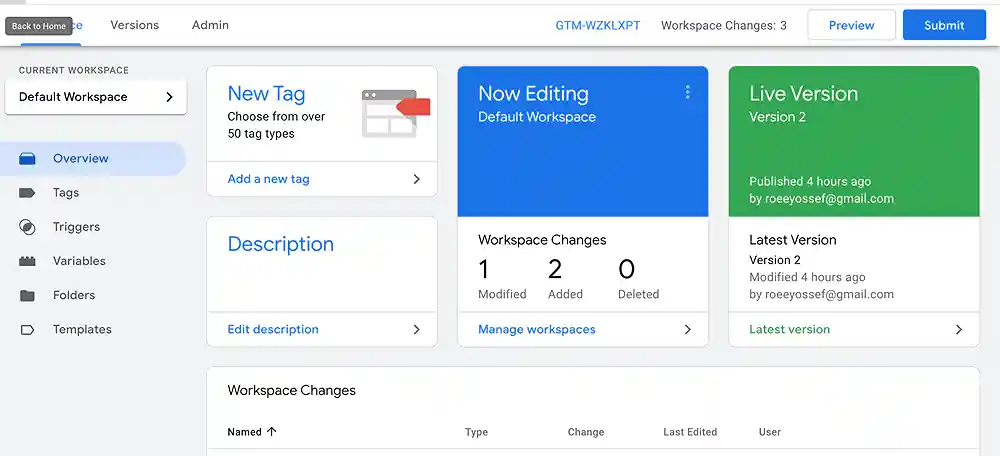
- Go to Google Tag Manager and sign in with your Google account.
- Click on “Create Account” to initiate the setup process.
- Enter an account name, select your country, and choose whether you want to share anonymous data with Google.
- After setting up your account, click on “Create Container.“
- Enter a container name (usually your website’s name), choose a target platform (Web, iOS, Android), and click “Create.”
- Accept the Terms of Service and manage the container’s settings.
- Upon container creation, GTM will provide you with a container snippet.
- Log in to your WordPress admin panel. In the left-hand menu, go to “Plugins” and click on “Add New Plugin.“
- Search for “Site Kit by Google,” install, and activate the plugin.
- In your WordPress dashboard, click on the “Site Kit” tab.
- Follow the on-screen prompts to connect your Google account with Site Kit.
- In the Site Kit dashboard, go to the “Settings” tab.
- Scroll down to find the “Tag Manager” section. Enable GTM by clicking on the toggle button.
- Authorize Site Kit to access your GTM account.
- Open the GTM website in a new tab or window. In your account, locate your container ID. It typically starts with “GTM-.” Copy the ID.
- Return to the Site Kit settings in your WordPress dashboard. Paste the GTM Container ID into the designated field.
- Click on the “Save Changes” button to apply the configuration.
- Site Kit settings, check that the GTM section indicates that it’s connected and the container ID is verified.
- In the GTM account, confirm that the installation status is marked as “Verified.”
- Add Tags, Triggers, and Variables
- Create a tag: go to the “Tags” section and click on “New.” Choose a tag type (e.g., Google Analytics), configure the tag settings, and define the trigger for when the tag should fire.
- Configure triggers: triggers define when tags should fire. Create triggers based on events such as page views, form submissions, or specific user interactions.
- Define variables: variables hold dynamic values that can be used in tags and triggers. Configure variables to capture relevant information, such as page URLs or user engagement.
- Use the “Preview” mode in GTM to test your tags, triggers, and variables before publishing them to your live website.
- Once satisfied with your setup, click on “Submit” to publish the changes.
- The updated container will now be live on your website.
4. Using the WordPress Customizer
Use case: adding CSS codes to your website
WordPress provides a user-friendly customizer that allows you to add code without directly editing theme files.
How to set up

- Log in to your WordPress admin panel. In the left-hand menu, go to “Appearance” > “Customize.”
- Look for the section “Additional CSS” where you can add your custom code.
- Paste your code, and click “Publish” to save changes.
5. Page- or post-specific code
1. Classic editor Text/HTML tab
Use case: If you need code to run on a specific page or post.
How to set up
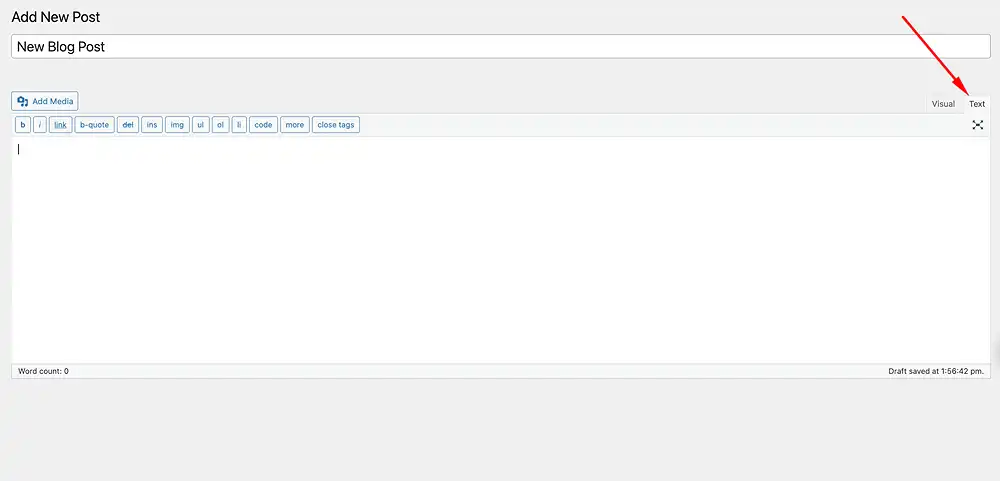
- While editing the page or post using the Classic editor, switch to the Text or HTML tab.
- Insert your code where needed.
- Publish your content when finished.
2. Gutenberg editor Code or Custom HTML block
Use case: simple code snippets like tracking codes or social media embeds in the Gutenberg/block editor.
How to set up
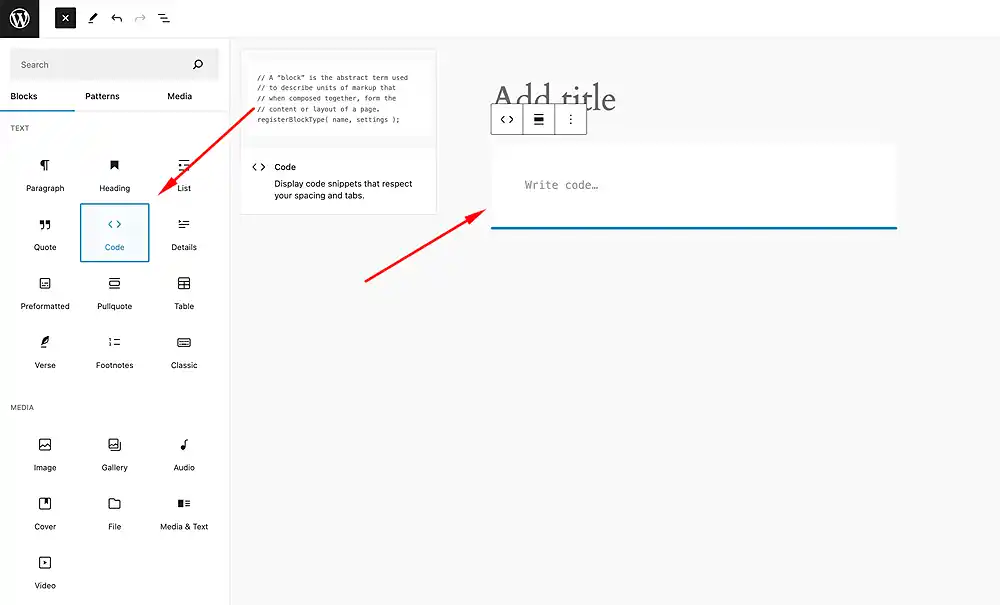
- Open your post or page using the Gutenberg editor, click the “+” icon, and search for “Code or Custom HTML.
- Paste your code directly into the block’s text area.
- Publish your content when finished.
6. Using the Theme File Editor
Use case: For theme-specific customizations
This option is for advanced users only, as the customization requires PHP knowledge.
Use a child theme to avoid losing changes during theme updates.
How to set up

- Access your theme’s files via Appearance > Theme File Editor.
- Locate the appropriate file (e.g., header.php, functions.php).
- Insert your code directly into the file.
7. Using FTP
Use case: For theme-specific customizations
If you’re comfortable with basic HTML and PHP, you can directly edit your theme files.
Remember to create a child theme to avoid losing changes during theme updates.
How to set up
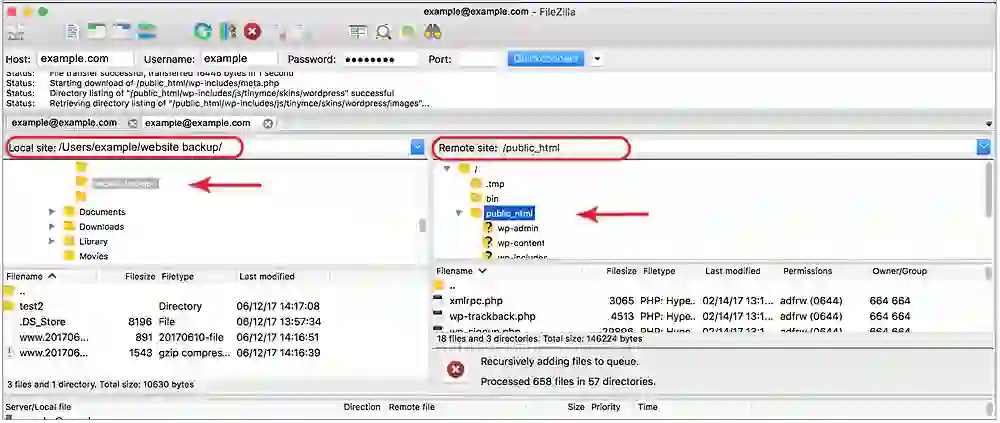
- Access your WordPress files via FTP or your hosting file manager.
- Locate the theme folder and navigate to the appropriate file (e.g., header.php or footer.php).
- Insert your code in the desired location.
Tutorials on YouTube
And if you’re looking for more in-depth WordPress tutorials,be sure to subscribe to our YouTube channel! We have a wide variety of videos on WordPress.