Monetizing your website is a strategic move that not only fuels your passion for content creation but also opens up avenues for sustainable revenue.
One of the most popular ways to place advertisements on a WordPress website is to use Google AdSense.
Google AdSense, a leading advertising platform, empowers website owners to display targeted ads and earn revenue through user interactions.
Think of Adsense as your virtual landlord, renting out tiny ad spaces on your website to eager advertisers.
Adsense matches those ads with your audience’s interests, and every click translates into a little jingle in your pocket.
These ads are tailored to the content of your website, creating a non-disruptive and engaging experience for your audience.
Advertisers pay you for clicks or impressions, providing a straightforward way to monetize your web traffic.
In this blog post, we’ll explore the benefits of Google AdSense and guide you through the seamless process of integrating it with your WordPress website.
Benefits of using AdSense on your website
- Easy setup: AdSense is user-friendly, making it accessible for website owners with varying technical expertise. Just create an Adsense account, grab some code, and paste it into your WordPress dashboard.
- Contextual targeting: The ads displayed are contextually relevant to your content, increasing the likelihood of user engagement.
- Revenue potential: Earn revenue through clicks or impressions, creating a steady income stream from your website.
- Ad variety: AdSense offers a range of ad formats, including display ads, text ads, link units, and even in-content ads that blend seamlessly with your content, ensuring flexibility in integration.
- Ad quality: AdSense prioritizes high-quality ads, enhancing the user experience, and maintaining the credibility of your website.
- Vast advertiser pool: Google’s got millions of advertisers, meaning your blog will automatically see relevant and targeted ads.
- Detailed ad reporting: Track your clicks, impressions, and earnings in real time with Adsense’s comprehensive reporting tools.
Key features of AdSense
1. Contextual ads
AdSense analyzes the content of your pages and displays ads relevant to your audience’s interests.
2. Flexible ad formats
Choose from a variety of ad formats, including display ads, text ads, link units, and responsive ads that adapt to different screen sizes.
3. Automatic ad placement
AdSense uses machine learning to automatically optimize ad placements on your site for maximum revenue.
4. Performance reports
Access detailed reports that provide insights into your earnings, ad performance, and audience engagement.
5. Monetization for various content types
AdSense supports a range of content types, including websites, blogs, forums, and mobile apps.
Getting started with AdSense
- Go to the Google AdSense website and sign in with your Google account or create a new one.
- Enter your website URL, choose the language of your content, and select an account type (individual or business).
- Follow the instructions to connect your website to AdSense. This may involve adding a piece of code to your site or using a Google Site Kit plugin.
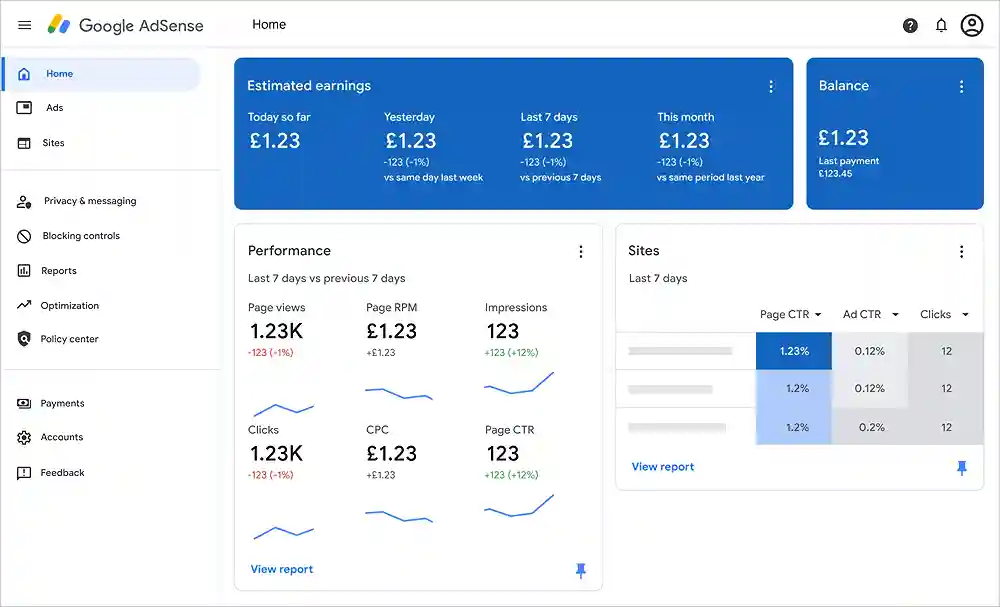
- Once your site is connected, access the AdSense dashboard.
- Click on “Ads” and then “Ad units.” Create different types of ad units based on your preferences and site layout.
- Customize the appearance of your ad units by selecting appropriate sizes, styles, and colors that blend seamlessly with your website’s design.
- Consider using responsive ad units to ensure optimal display on various devices and screen sizes.
- After creating ad units, AdSense will provide you with a code snippet for each ad.
Connecting your website to AdSense using Site Kit

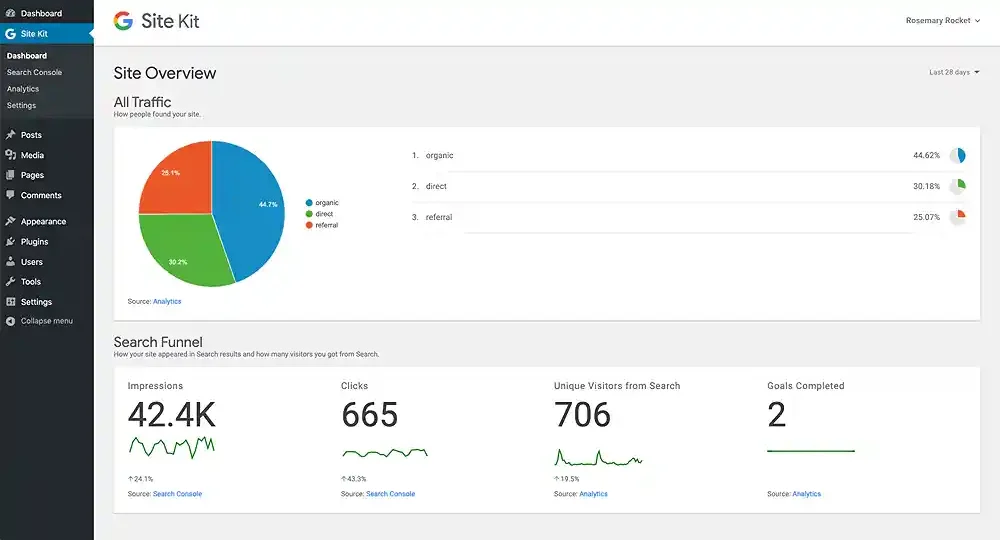
Site Kit is an official Google plugin designed for WordPress, offering a unified dashboard that simplifies the integration of various Google services.
This plugin allows you to connect your WordPress website with Google Analytics, Search Console, PageSpeed Insights, Tag Manager, and, importantly, Google AdSense.
Why use the Google Site Kit?
- Access Google services and analytics directly within your WordPress dashboard for a seamless user experience.
- Site Kit simplifies the setup process, reducing the technical complexity associated with integrating Google services.
- Gain valuable insights into your website’s performance, user engagement, and ad revenue through a single interface.
- Easily connect your Google AdSense account to your WordPress site through Site Kit, allowing for straightforward ad placement.
Guide to using site Kit
- Set up your Adsense account as earlier discussed and submit your website for approval. Once approved, you can then generate an ad code.
- In your WordPress dashboard, navigate to “Plugins” and click on “Add New.”
- Search for “Site Kit” and install and activate the plugin.
- Once activated, you’ll see a new “Site Kit” menu in your dashboard. Click on “Start Setup” to begin the setup process.
- Choose the Google account associated with your AdSense account.
- Follow the on-screen instructions to verify ownership of your website using Google Search Console. Complete the verification process to proceed.
- After verification, Site Kit will prompt you to enable AdSense. Click on “Connect Service” for AdSense. Follow the prompts to connect to your AdSense account.
- Site Kit will automatically detect your AdSense account. Click Save Changes when finished.
Connecting your website to AdSense using an ad plugin

Common ad plugins
These plugins can provide you with more control over the appearance and placement of your ads, as well as ad scheduling, targeting, analytics, etc. letting you optimize your ad strategy like a pro.
Some popular advertising WordPress plugins include:
A guide to using an ad plugin
- Set up your Adsense account as earlier discussed and submit your website for approval. Once approved, you can then generate an ad code.
- In your AdSense dashboard, navigate to “Ads” and click on “Ad units.”
- Create different ad units based on your preferences and the layout of your website. Copy the generated ad codes provided.
- In your WordPress dashboard, navigate to “Plugins” and click on “Add New.”
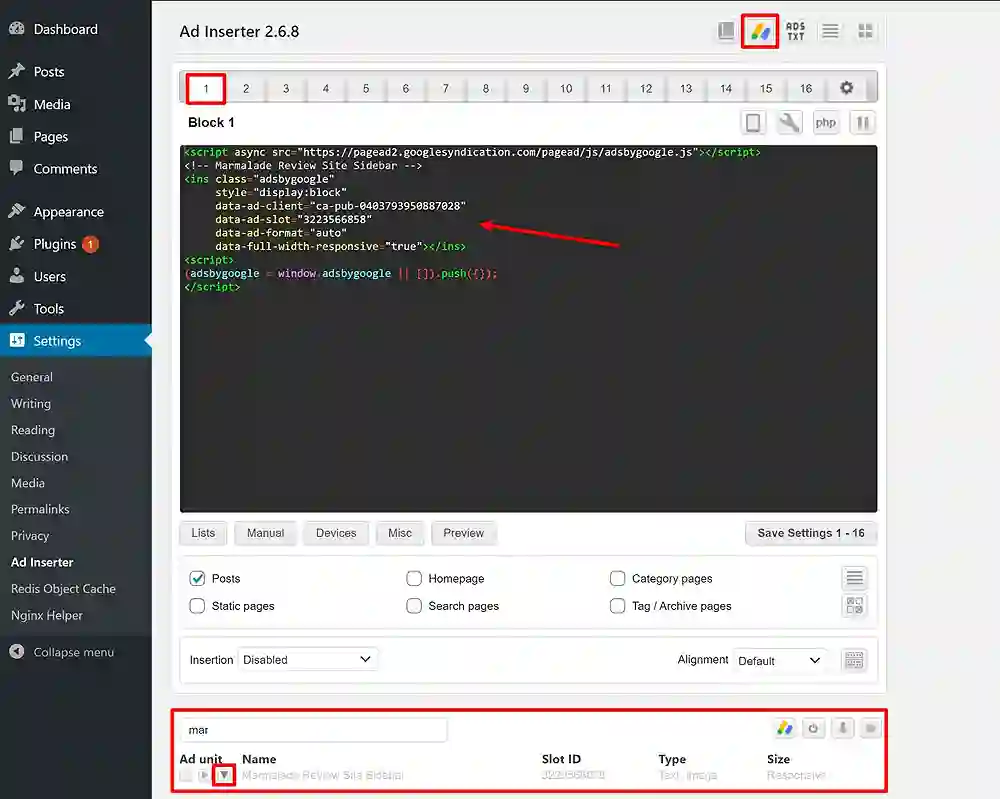
- Search for the “Ad Inserter” plugin, and install and activate the plugin.
- Go to the “Ad Inserter” menu on the left side of your WordPress dashboard.
- Paste the copied ad code in the designated area for the desired ad placement (e.g., sidebar, header, or within content) and save changes.
- View your website to ensure ads are displayed correctly. Test ad responsiveness and check for proper integration.
Leveraging AdSense for website success
1. AdSense dashboard

- Regularly access the AdSense dashboard to monitor performance reports, including earnings, click-through rates, and impressions.
- Experiment with different ad placements to find the optimal positions for higher visibility and engagement.
- Select ad types that align with your audience and content, such as display ads, link units, or matched content.
- Adhere to Google AdSense policies to maintain a healthy and sustainable relationship with the platform
2. Site Kit dashboard

- Return to the Site Kit dashboard regularly to monitor AdSense performance and other Google services.
- Analyze data to optimize ad placements and improve revenue potential.
- Quality content attracts more visitors and increases the likelihood of relevant ads being displayed.
- Ensure your website has a responsive design to accommodate various devices and screen sizes.
3. Ad plugin

- Place your ads in strategic locations, including the sidebar, above or below the fold, and in between content blocks.
- Don’t overdo it, as too many ads can be annoying and overwhelming for visitors. Aim to place a few well-placed ads on each page of your website.
- Analyze data to optimize ad placements and improve revenue potential.
Did you enjoy this post?
If so, please share it with your friends and followers on social media! It's a great way to help others learn about WordPress and to support our blog. You can use the share buttons below...
Elevate Your Brand with Professional Website Design
Discover how we can transform your online presence with professional website design services. We specialise in creating modern, user-friendly websites tailored for the medical, legal, university, and Christian sectors. If you're ready to elevate your brand and connect with your audience more effectively, contact us today to get started!
Tutorials on YouTube
And if you’re looking for more in-depth WordPress tutorials,be sure to subscribe to our YouTube channel! We have a wide variety of videos on WordPress.
