The ability to seamlessly manage and deploy tracking codes is paramount for informed decision-making.
Google Tag Manager (GTM), a robust solution by Google, takes center stage in simplifying this process.
GTM is a user-friendly tag management system that simplifies the process of deploying and managing tracking codes on your website.
Traditionally, implementing tracking codes for analytics, conversion tracking, and other marketing tags required manual intervention in the website’s source code.
GTM streamlines this process, allowing users to add, edit, and update tags through an intuitive web interface without the need for coding expertise.
When combined with the Site Kit WordPress plugin, the power of tracking, analyzing, and optimizing user interactions on your WordPress website reaches new heights.
It is a game-changer for marketers, webmasters, and developers.
In this blog post, we’ll embark on a journey into the realm of Google Tag Manager, exploring its functionalities, benefits, and how it can revolutionize the way you manage tracking codes on your website.
Why use Google Tag Manager (GTM)?
- Code-free tracking: Say goodbye to coding sessions for every new tracking tool. Drag-and-drop interfaces and pre-built templates make adding and managing tags a breeze, even for code-phobic folks.
- Centralized control: No more hunting for tracking code snippets scattered across your website. GTM keeps everything centralized, making it easy to update, disable, or remove tags as needed.
- Faster website development: with GTM, you can take control and add essential tags yourself and not wait for developers to implement new tracking requests, saving time and resources.
- Deeper Data Insights: Combine and analyze data from multiple tools within GTM, gaining a clearer picture of user behavior and website performance.
Key features of GTM
1. Centralized management
Store and manage all your tags in one centralized location, providing a unified platform for tracking code implementation.
2. User-friendly interface
Enjoy a straightforward web interface that eliminates the need for manual coding, making tag management accessible to a wider audience.
3. Version control
Maintain version control of your tags, ensuring that changes are tracked and documented and can be rolled back if needed.
4. Built-in tags and templates
Access a range of built-in tags and templates for popular analytics, advertising, and other tracking services, simplifying the setup process.
5. Advanced functionality
Implement triggers and variables to create sophisticated tag configurations based on specific user interactions or page conditions.
Getting started with GTM
- Go to Google Tag Manager and sign in with your Google account.
- Click on “Create Account” to initiate the setup process.
- Enter an account name, select your country, and choose whether you want to share anonymous data with Google.
- After setting up your account, click on “Create Container.“
- Enter a container name (usually your website’s name), choose a target platform (Web, iOS, Android), and click “Create.”
- Accept the Terms of Service and manage the container’s settings.
- Upon container creation, GTM will provide you with a container snippet. Copy the snippet and paste it into the header of your website.
- Confirm the successful installation of the container snippet by checking the container’s status in GTM.
- Add Tags, Triggers, and Variables
- Create a tag: go to the “Tags” section and click on “New.” Choose a tag type (e.g., Google Analytics), configure the tag settings, and define the trigger for when the tag should fire.
- Configure triggers: triggers define when tags should fire. Create triggers based on events such as page views, form submissions, or specific user interactions.
- Define variables: variables hold dynamic values that can be used in tags and triggers. Configure variables to capture relevant information, such as page URLs or user engagement.
- Use the “Preview” mode in GTM to test your tags, triggers, and variables before publishing them to your live website.
- Once satisfied with your setup, click on “Submit” to publish the changes.
- The updated container will now be live on your website.
Connecting your website to GTM
When integrated with Site Kit, GTM provides users with a centralized hub within their WordPress dashboard to access not only GTM but also other essential Google services like Analytics, Search Console, AdSense, and PageSpeed Insights. Other benefits include:
- Forget complex setup processes. Site Kit seamlessly integrates GTM into your WordPress dashboard, making it as easy as installing a plugin.
- Skip the coding headaches! Site Kit offers a library of pre-built tag templates for popular tools, allowing you to set up essential tracking with a few clicks.
- Take the guesswork out of tag-firing. Site Kit automatically triggers your tags based on specific user actions or page visits, ensuring accurate data collection.
Steps to using the Site Kit plugin
- Log in to your WordPress admin panel. In the left-hand menu, go to “Plugins” and click on “Add New Plugin.“
- Search for “Site Kit by Google,” install, and activate the plugin.
- In your WordPress dashboard, click on the “Site Kit” tab.
- Follow the on-screen prompts to connect your Google account with Site Kit.
- In the Site Kit dashboard, go to the “Settings” tab.
- Scroll down to find the “Tag Manager” section. Enable GTM by clicking on the toggle button.
- Authorize Site Kit to access your GTM account.
- Open the GTM website in a new tab or window. In your account, locate your container ID. It typically starts with “GTM-.” Copy the ID.
- Return to the Site Kit settings in your WordPress dashboard. Paste the GTM Container ID into the designated field.
- Click on the “Save Changes” button to apply the configuration.
- In the GTM account, confirm that the installation status is marked as “Verified.”
- Site Kit settings, check that the GTM section indicates that it’s connected and the container ID is verified.
Leveraging GTM for website success
1. GTM dashboard
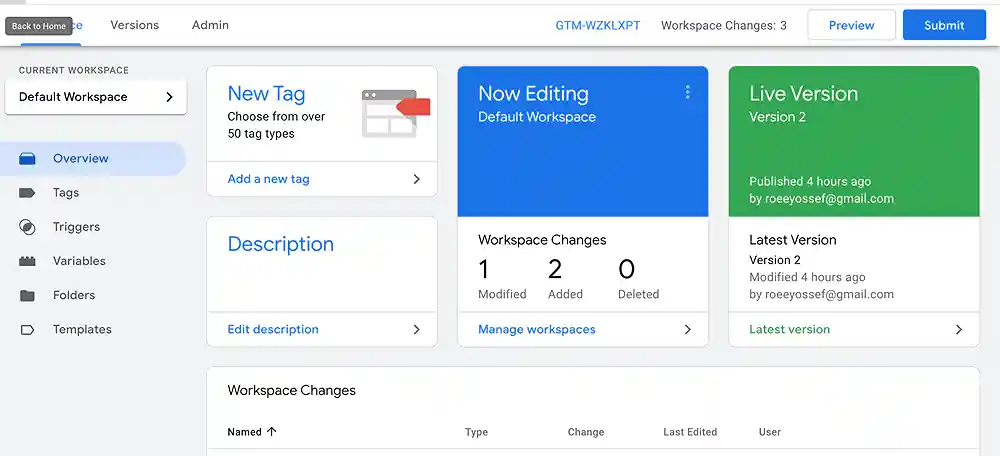
- Utilize custom variables: Capture dynamic data on your website, like product IDs or user locations, to personalize your tag firing and gain richer insights.
- Leverage the data layer: Work with your developers to implement a data layer on your website, making it easier to pass specific information to your tags.
- Explore container versions: Utilize GTM’s version control system to test new tag configurations without affecting your live website.
- Collaborations: work seamlessly with your team or clients by providing access to GTM, allowing multiple stakeholders to contribute to tracking code implementation.
- Stay updated: GTM is constantly evolving with new features and functionalities. Keep yourself informed to unlock its full potential.
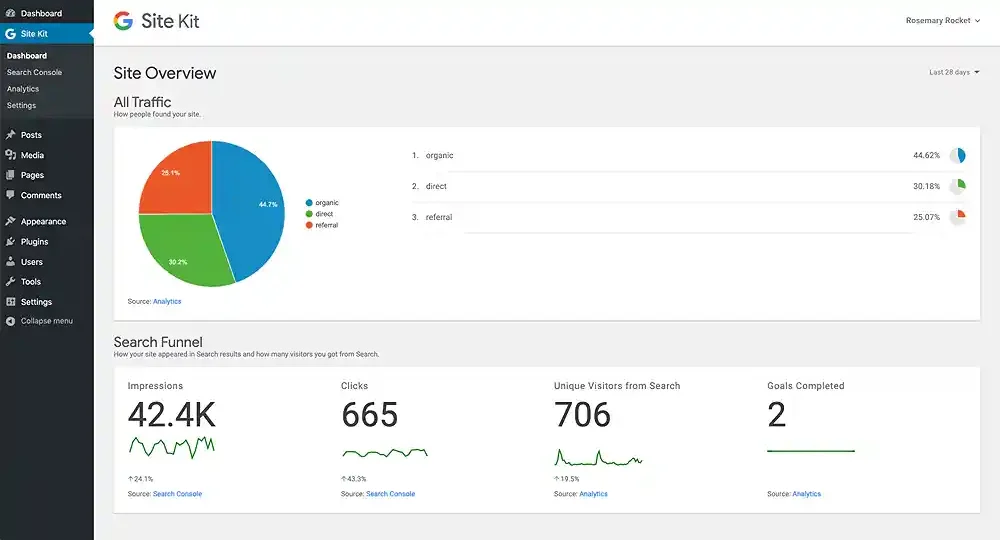
2. Site Kit dashboard
- Explore templates: Utilize Site Kit’s pre-built templates for popular tools like Google Analytics, Facebook Pixel, and Hotjar.
- Customize and trigger: fine-tune templates or create custom tags to track specific user behavior and website interactions.
- Monitor performance: Track the performance of your tags within Site Kit and analyze data from all connected tools in a centralized location.
- Site Kit recommendations: Leverage Site Kit’s suggested tags to track essential data points you might have missed, adding depth to your insights.
- Explore user flows: Analyze user journeys through your website using Google Tag Manager within Site Kit, identifying potential bottlenecks and areas for improvement.
- Connect to other Google services: Integrate Google Analytics, Search Console, and Adsense within Site Kit for a comprehensive view of your website’s performance and user engagement.
- Stay updated: Google Tag Manager and Site Kit are constantly evolving. Keep an eye out for new features and functionalities to maximize their potential.
Did you enjoy this post?
If so, please share it with your friends and followers on social media! It's a great way to help others learn about WordPress and to support our blog. You can use the share buttons below...
Tutorials on YouTube
And if you’re looking for more in-depth WordPress tutorials,be sure to subscribe to our YouTube channel! We have a wide variety of videos on WordPress.