By default, you can fire up the login page of any WordPress by adding the suffix /wp-admin to the domain link.
This applies to all WordPress websites and as such, poses a security risk as anyone can attempt to log into your site and try multiple login details.
To change from the default link to any text you want, you can make use of any of these 3 plugins.
- Ultimate dashboard: Change the login link and have a lot of control over designing the new login page
- Theme My Login: Change login link and add integration for email subscription, etc. (integrations are premium features)
- WPS Hide Login: Change the login link
1. Ultimate Dashboard Plugin
1. Look for the Ultimate Dashboard plugin in the WordPress plugin directory.
Install and activate the plugin

2. Hover over the Ultimate dashboard menu on the sidebar to expose the sub-menu items, and click on Login Redirect.

3. Change the new Login URL, Redirect Admin Area and Redirect After Login settings as you deem fit.
Click save changes and that’s it!

4. This is how the new login page looks on the front end.

2. Theme My Login Plugin
1. Look for the Theme My Login plugin on the WordPress plugin directory.
Install and activate the plugin.

2. Navigate to the plugin settings page
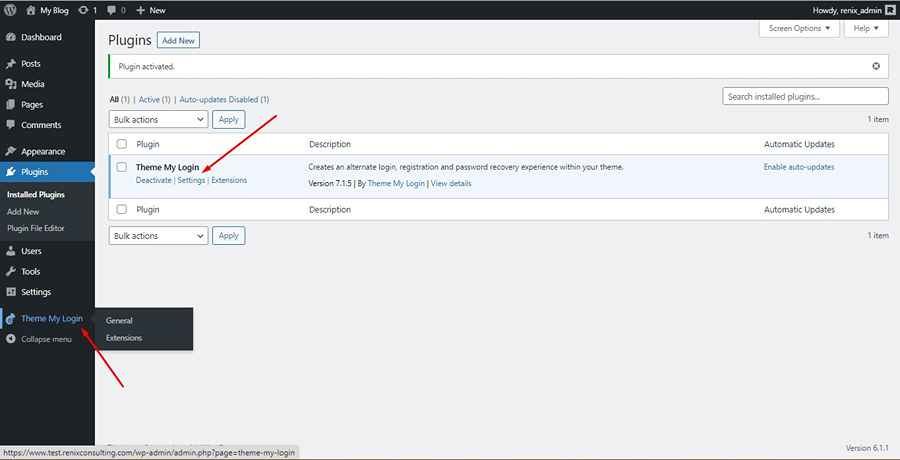
3. Change the login slug to any custom text you want. That’s all!

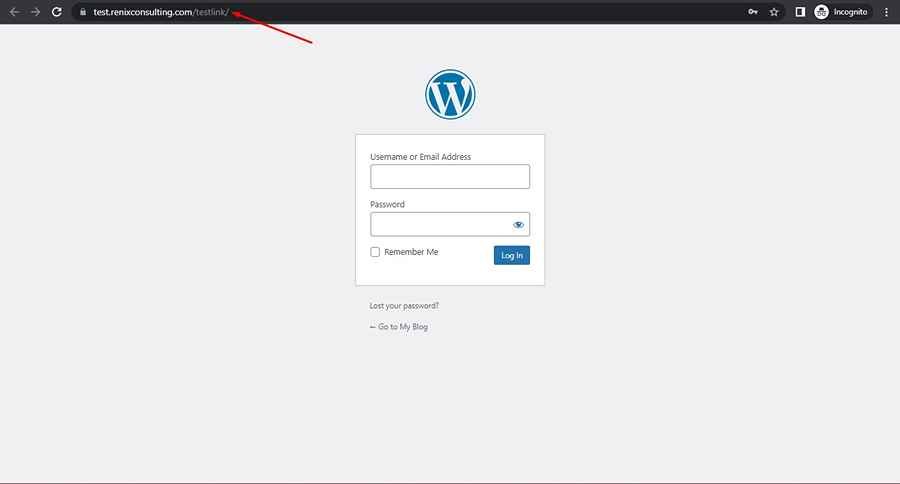
4. You now have a new login link.

Note-
- You can use shortcodes for this plugin, find out more here.
- You can use any of the following shortcodes
- For login page: [theme-my-login]
- For registration page: [theme-my-login action=”register”]
- For the lost password page: [theme-my-login action=”lostpassword”]
- For reset password page: [theme-my-login action=”resetpass”]
- You can purchase extensions to access more features like email subscriptions of users upon registration, etc.

3. WPS Hide Login
1. Look for the WPS Hide Login plugin on the WordPress plugin directory.
Install and activate the plugin.

2. Navigate to the plugin settings page

3. Change the login slug to any custom text you want. That’s all!

4. You now have a new login link.

5. This is how the new login page looks on the front end of the site.
Conclusion
The above 3 plugins do a good job of changing the login link for WordPress websites.
I will recommend you choose the Ultimate Dashboard plugin as it has more dashboard customization features like providing a lot of control over designing the login page, followed by the Theme My Login plugin, and lastly, the WPS Hide Login plugin.
Did you enjoy this post?
If so, please share it with your friends and followers on social media! It's a great way to help others learn about WordPress and to support our blog. You can use the share buttons below...
Tutorials on YouTube
And if you’re looking for more in-depth WordPress tutorials,be sure to subscribe to our YouTube channel! We have a wide variety of videos on WordPress.