You are almost ready to begin producing content once you have successfully installed WordPress on your preferred website hosting account.
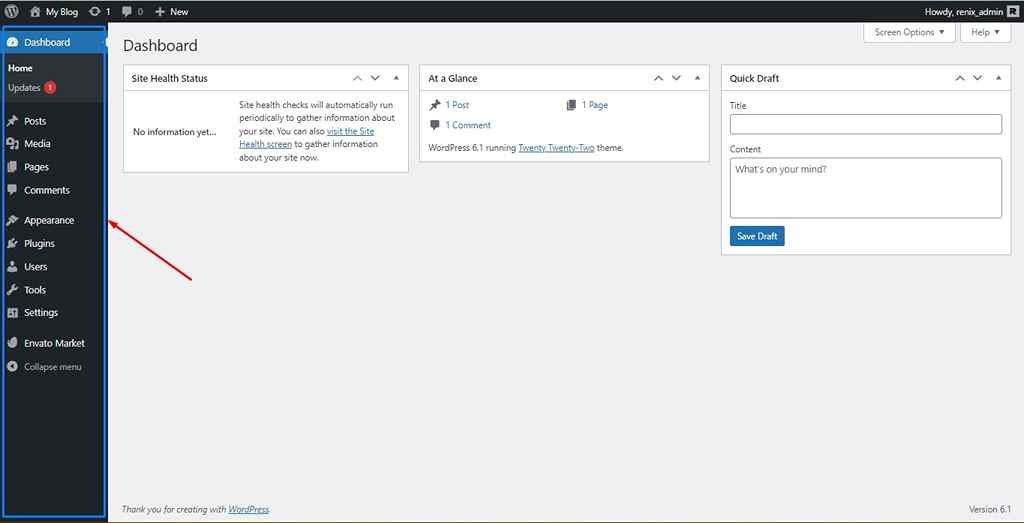
The back end of your website is the WordPress dashboard, also known as the WordPress admin or administrative dashboard.
It will be the first screen you see after logging into your WordPress site and it is here that you will build, manage, maintain, and customize your site so that it reflects your brand.
It may also be thought of as the background that governs the operation and appearance of your WordPress website or blog.
It is made to make the process of creating and managing the content for your website easier therefore, you need to become familiar with all the settings and components on the WordPress dashboard if you want to create a great WordPress website.
I will simplify the learning curve of the WordPress dashboard in this post by providing you with a thorough tour of the default display.
Let us begin!
Divisions of the WordPress dashboard
The WordPress dashboard has three primary sections by default, each of which is located in a separate area of the dashboard:
- The administrative toolbar
- The information hub
- The left-side menu
1. The administrative toolbar

Although you might not use it regularly, the administrative toolbar is yet another essential section of the WordPress dashboard.
This is the toolbar at the top of your site, both in the backend and front end, which is displayed as long as you are logged into your admin account and is only visible to you.
Nonetheless, based on the specific content you are viewing and the installed plugins, you can see different layouts.
It has four icons by default on the left and one on the right side of the toolbar.
From left to right, the icons let you do the following:
- WordPress icon: to access backlinks to WordPress formal site, WordPress-related documentation, support, etc.
- Home icon: to toggle between the back end and front end of your website.
- 2 arrows making a circle icon: to display pending software updates
- Comments icon: to handle comments for your posts and pages.
- Plus icon: to add new content including posts, media, pages, and users.
- Howdy, username link: the only one of the admin toolbar items located on the right-hand side, to access your profile’s settings.
2. The information hub

This section covers most of the screen and helps you to fully take control of your site.
As you’d imagine, the information displayed here changes constantly depending on the selected feature in the navigation sidebar.
The first time you log into your account, you’ll be greeted by a default welcome message and other useful tips to help you get started.
Installing new plugins or themes can sometimes display a welcome page here too.
3. The left-side menu

This is the only component of your dashboard that is on the left and it is the one you will probably use most frequently because almost all WordPress options are accessible from here with many of the menu items having nested menus and sub-menus.
It has almost all of the configurations that control every aspect of your website.
You have two options for accessing any sub-item of any item in this section of the dashboard: click the desired menu to expand its sub-menu, or hover above it to have its sub-menu items flown out for you to select.
Components of the left-side menu
The WordPress dashboard’s left-side or navigation menu section by default shows the following items in order from top to bottom.
Other custom menu items would be added based on the theme you have chosen and the plugins you have installed.
1. Dashboard

When you initially log in to the backend of your website, you will see this page.
The five default widgets seen here are Welcome, At a Glance, Exercise, Quick Draft, and WordPress Information.
These widgets give you a quick snapshot of the activity on your website or blog as well as some website statistics.
Additionally, they provide some helpful backlinks to help you get started managing, browsing, and modifying your WordPress website.
By switching the Screen Options button, which is located in the dashboard’s upper right corner, you can decide whether or not to keep the widgets on this screen.
2. Posts
i. Posts: You use these for creating blog posts as they are chronological content pages, meaning they have a real publication date and are listed from most recent to oldest.
Posts are shown in reverse chronological order, with the most recent one at the top, and they represent the blogging functionality of your WordPress website or blog.
When you select All Posts from the dashboard, a list of all of your site’s posts—published, drafts, and trashed is displayed.
You may view, edit, or delete a post by using the menu that appears when you hover over it.

ii. Categories: they are taxonomies for posts on your site, each post must have at least one category.
Additionally, categories are usually a bit broad.

iii. Tags: they are another way to organize your posts and are more specific taxonomies for posts.
Their use is optional.

3. Media
Here, you have the option of visiting the Library or adding new media under the Media option.
Each media file on your website is stored in the library, which has some media editing features on a “per-image” basis.
The Add New option enables you to submit media files using either a multi-file or browser-based uploader.

4. Pages
They are for static content and, unlike Posts, they do not have publication dates.
They can be used to create infrequently changed pages on your website like the homepage, contact page, and About page.
You will hover over the Pages tab in the navigation sidebar and select either the All Pages or Add New button, which is quite similar to how you create and edit posts in WordPress.
There are no taxonomy screens here because pages do not use them.

5. Comments
The comments menu displays all of the comments made on your WordPress website.
Comments are a reflection of the dialogue you and your readers have had.
From this page, you can look at all of the commentators and take appropriate action, such as approve/disapprove, reply, swift edit, edit, or move to spam or trash.

6. Appearance
Using the Appearance menu, WordPress enables you to customize the look of your website.
Here, you may change the entire layout, style, and navigation of your website or blog.
i. Themes: this lets you activate, customize, and remove themes that have been installed on your website.
You can also install any of the free themes available in the WordPress Theme Directory.

ii. Widgets: this lets you customize the widgets displayed on the sidebar and the footer sections of your website.

iii. Menus: this lets you make changes to your website menu displays.

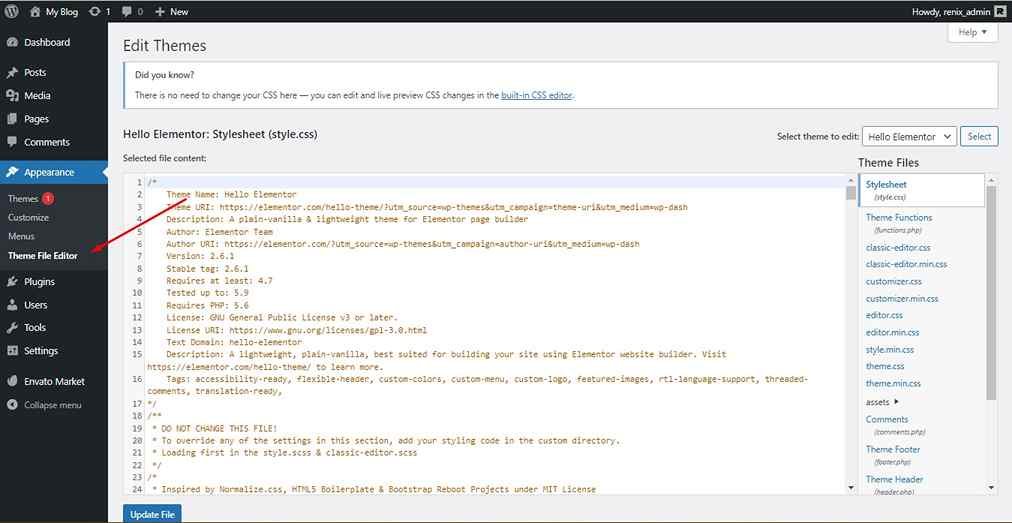
iv. Theme File Editor: If you have coding knowledge, this lets you edit any of your themes’ files using CSS.

7. Customizer
You are directed to the Live Customizer when you click on Customize.
This is a straightforward editor made to assist you in changing just about any part of the aesthetic of your website and you get to see those changes take effect in real-time.

8. Plugins
Your installed plugins are listed on the Plugins panel, where you can take actions like activate, deactivate, trash, etc.
Since you will probably be using this page frequently, it is worthwhile to spend some time navigating through it and accessing the settings for each plugin.
Additional features and functionalities are added by plugins to your WordPress website or blog.
Many of them may be downloaded for free from the WordPress plugin directory.
Others are generally of higher quality and charge a fee for use.

9. Users
i. Users: Here, you can add or modify the users on your website and give them access to various responsibilities, such as Administrator, Editor, Writer, Contributor, and Subscriber.

ii. Profile: You may view and modify your WordPress website’s administrative account right here.

10. Tools
i. Available Tools: view available tools on your WordPress website, by default, the Categories/Tags converter is accessible here.

ii. Import: To import compatible content to your website.

iii. Export: To export a set of content from your website.

iv. Site Health: An overview of your website health and recommendations on what to improve on.

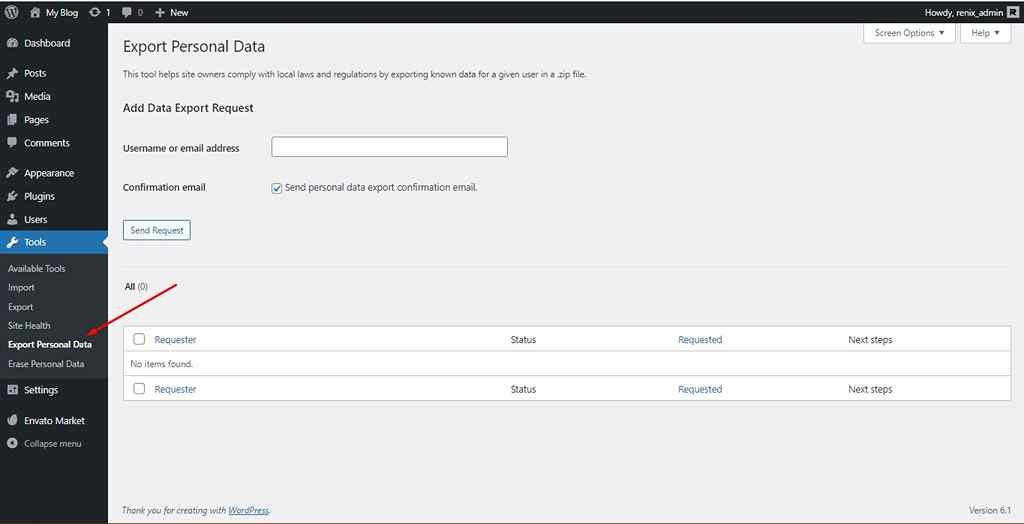
v. Export Personal Data: A feature to comply with user privacy laws by requesting access to export their data.

vi. Erase Personal Data: A feature to comply with user privacy laws by requesting access to erase their data.

11. Settings
One of the first menu items you will want to access when setting up your new site is the Settings page because it gives you further control over other crucial components of your website.
It has the following sub-menus: General, Writing, Reading, Discussion, Media, and Permalinks.
i. General: includes settings for website title, tagline, language, date, time settings, etc.

ii. Writing: includes settings for default posts category and format.

iii. Reading: includes settings for the homepage and blog page, excerpt display format, and search engine visibility.

iv. Discussion: includes settings for moderating user comments.

v. Media: includes settings to configure custom dimensions for different-sized images.

vi. Permalinks: It lets you set permalinks for your website.

vii. Privacy: It lets you set a privacy policy for your site.

Conclusion

The WordPress dashboard provides a ton of options to customize your website, so many that you could experiment with them indefinitely.
Take note that depending on the plugins and themes you install, your WordPress dashboard may also see additional menus and sub-menu like the Envato menu in the image displayed above.
However, as far as the default display goes, the above covers it all!
Did you enjoy this post?
If so, please share it with your friends and followers on social media! It's a great way to help others learn about WordPress and to support our blog. You can use the share buttons below...
Elevate Your Brand with Professional Website Design
Discover how we can transform your online presence with professional website design services. We specialise in creating modern, user-friendly websites tailored for the medical, legal, university, and Christian sectors. If you're ready to elevate your brand and connect with your audience more effectively, contact us today to get started!
Tutorials on YouTube
And if you’re looking for more in-depth WordPress tutorials,be sure to subscribe to our YouTube channel! We have a wide variety of videos on WordPress.
