Dashboard cleanup
This is the first screen you will see on logging in to your WordPress site.
It is usually filled with notification boxes and screen elements, you can customize them by clicking on the screen options box in the top right-hand corner of the page and deselecting the boxes you do not want to see.

Logging in and logging out of WordPress
1. Login: You can log in to your site by appending ‘wp-admin’ to the end of your domain name e.g. ‘www.example.com/wp-admin’.
You would need to fill in the spaces provided for your username and password which you created when you installed WordPress to log in.
If you would like to customize the login page, you can go through this guide.

2. Log out: navigate to the top right-hand side of the WordPress dashboard, hover over the Howdy, username, and click on the ‘Log out’ link displayed.

Deleting demo data
These are the default data that come with every new WordPress installation.
You don’t need them so, I will recommend you delete them.
1. Posts
On the left menu bar, click on Posts. Hover on the “Hello world!” post and click Trash.

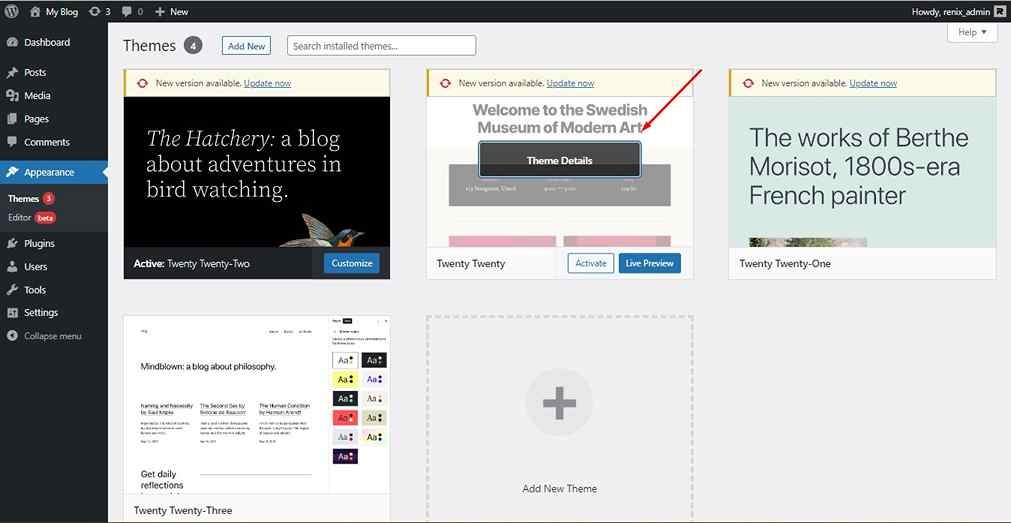
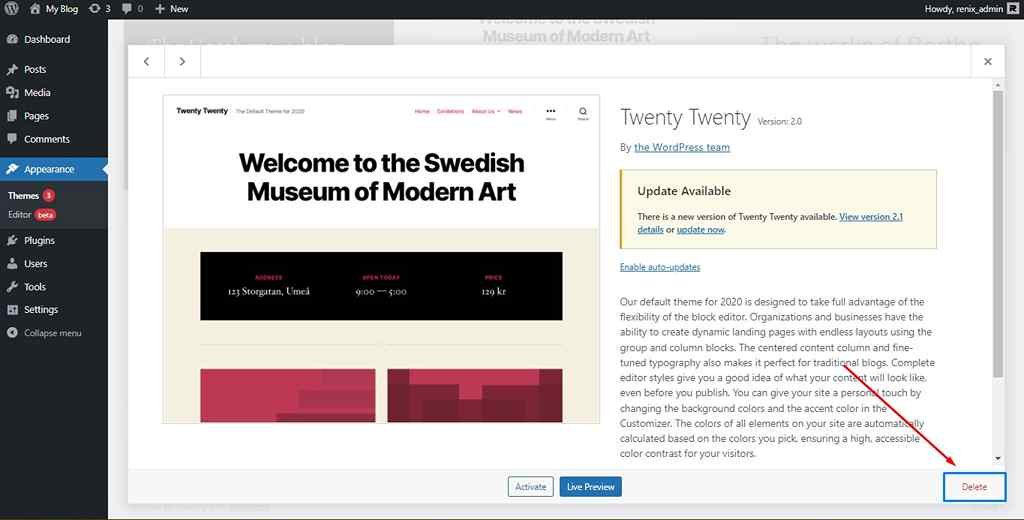
2. Themes
Also on the left menu, click on Appearance and go to Themes.
Click on any of the unused themes to delete them.


Settings
1. General
On the menu, click on Settings, and navigate to General.
Here, you can further change your website name and description, tick the membership checkbox, choose your time zone, date and time format, and day of week start.
Click on Save Changes when done.

2. Permalinks
On the menu, click on Settings, and navigate to Permalinks.
You can customize how your website links will be displayed, I recommend you do this now and only once as if you changed it later, all your prior links will be invalid.
If you are not sure of what to choose here, choose the Post name option indicated.

Adding users – writers/authors
To add users, navigate to the Users tab on the admin menu, and click on the Add New sub-menu.
Fill out the new user form, indicating the desired role of the new user, and then click on the Add New User button.

Did you enjoy this post?
If so, please share it with your friends and followers on social media! It's a great way to help others learn about WordPress and to support our blog. You can use the share buttons below...
Elevate Your Brand with Professional Website Design
Discover how we can transform your online presence with professional website design services. We specialise in creating modern, user-friendly websites tailored for the medical, legal, university, and Christian sectors. If you're ready to elevate your brand and connect with your audience more effectively, contact us today to get started!
Tutorials on YouTube
And if you’re looking for more in-depth WordPress tutorials,be sure to subscribe to our YouTube channel! We have a wide variety of videos on WordPress.
